7、文件上传
1.单文件与多文件上传的使用
页面代码
1 /static/form/form_layouts.html
1
2
3
4
5
6
7
8
9
10
11
12
13
14
15
16
17
18
19
20
21
22
23
24
25
26
27
28
<form role="form" th:action="@{/upload}" method="post" enctype="multipart/form-data"> <div class="form-group"> <label for="exampleInputEmail1">邮箱</label> <input type="email" name="email" class="form-control" id="exampleInputEmail1" placeholder="Enter email"> </div> <div class="form-group"> <label for="exampleInputPassword1">名字</label> <input type="text" name="username" class="form-control" id="exampleInputPassword1" placeholder="Password"> </div> <div class="form-group"> <label for="exampleInputFile">头像</label> <input type="file" name="headerImg" id="exampleInputFile"> </div> <div class="form-group"> <label for="exampleInputFile">生活照</label> <input type="file" name="photos" multiple> <!--多文件上传, 使用multiple --> </div> <div class="checkbox"> <label> <input type="checkbox"> Check me out </label> </div> <button type="submit" class="btn btn-primary">提交</button> </form>
MultipartFile自动封装上传的文件
1
2
3
4
5
6
7
8
9
10
11
12
13
14
15
16
17
18
19
20
21
22
23
24
25
26
27
28
29
30
31
32
33
34
35
36
37
38
@Slf4j @Controller public class FormTestController { @GetMapping("/form_layouts") public String form_layouts(){ return "form/form_layouts"; } @PostMapping("/upload") public String upload(@RequestParam("email") String email, @RequestParam("username") String username, @RequestPart("headerImg") MultipartFile headerImg, @RequestPart("photos") MultipartFile[] photos) throws IOException { log.info("上传的信息:email={},username={},headerImg={},photos={}", email,username,headerImg.getSize(),photos.length); if(!headerImg.isEmpty()){ //保存到文件服务器,OSS服务器 String originalFilename = headerImg.getOriginalFilename(); // 获取文件名 , getName() 是获取标签的名字(name="headerImg") headerImg.transferTo(new File("H:\\cache\\"+originalFilename)); } if(photos.length > 0){ for (MultipartFile photo : photos) { if(!photo.isEmpty()){ String originalFilename = photo.getOriginalFilename(); photo.transferTo(new File("H:\\cache\\"+originalFilename)); } } } return "main"; } }
文件上传相关的配置类:
org.springframework.boot.autoconfigure.web.servlet.MultipartAutoConfigurationorg.springframework.boot.autoconfigure.web.servlet.MultipartProperties
文件大小相关配置项:
1
2
spring.servlet.multipart.max-file-size=10MB spring.servlet.multipart.max-request-size=100MB
2.文件上传参数解析器[源码分析]
文件上传相关的自动配置类MultipartAutoConfiguration
自动配置好了StandardServletMultipartResolver [文件上传解析器]
如果有需求可以自己配置文件上传解析器
原理步骤:
请求进来使用文件上传解析器判断(isMultipart)并封装(resolveMultipart,返回MultipartHttpServletRequest)文件上传请求
参数解析器来解析请求中的文件内容封装成MultipartFile
将request中文件信息封装为一个Map;MultiValueMap<String, MultipartFile>
FileCopyUtils。实现文件流的拷贝
1
2
3
4
5
6
7
8
9
10
11
12
13
14
15
16
17
18
19
20
21
22
23
24
25
26
27
28
29
30
31
32
33
34
35
36
37
38
39
40
41
42
43
44
45
46
47
48
49
50
51
52
53
54
55
56
57
58
59
60
61
62
63
64
65
66
67
68
69
70
71
72
73
74
75
76
77
78
79
80
81
82
83
84
85
86
87
88
89
90
91
92
93
94
95
96
97
98
99
100
101
102
103
104
105
106
107
108
109
110
111
112
113
114
115
116
117
118
119
120
121
122
123
124
125
126
127
128
129
130
131
132
133
134
135
136
137
138
139
@Configuration(proxyBeanMethods = false) @ConditionalOnClass({ Servlet.class, StandardServletMultipartResolver.class, MultipartConfigElement.class }) @ConditionalOnProperty(prefix = "spring.servlet.multipart", name = "enabled", matchIfMissing = true) @ConditionalOnWebApplication(type = Type.SERVLET) @EnableConfigurationProperties(MultipartProperties.class) public class MultipartAutoConfiguration { private final MultipartProperties multipartProperties; public MultipartAutoConfiguration(MultipartProperties multipartProperties) { this.multipartProperties = multipartProperties; } @Bean @ConditionalOnMissingBean({ MultipartConfigElement.class, CommonsMultipartResolver.class }) public MultipartConfigElement multipartConfigElement() { return this.multipartProperties.createMultipartConfig(); } @Bean(name = DispatcherServlet.MULTIPART_RESOLVER_BEAN_NAME) @ConditionalOnMissingBean(MultipartResolver.class) public StandardServletMultipartResolver multipartResolver() { //配置好文件上传解析器 StandardServletMultipartResolver multipartResolver = new StandardServletMultipartResolver(); multipartResolver.setResolveLazily(this.multipartProperties.isResolveLazily()); return multipartResolver; } } //文件上传解析器 public class StandardServletMultipartResolver implements MultipartResolver { private boolean resolveLazily = false; public void setResolveLazily(boolean resolveLazily) { this.resolveLazily = resolveLazily; } @Override public boolean isMultipart(HttpServletRequest request) { return StringUtils.startsWithIgnoreCase(request.getContentType(), "multipart/"); } @Override public MultipartHttpServletRequest resolveMultipart(HttpServletRequest request) throws MultipartException { return new StandardMultipartHttpServletRequest(request, this.resolveLazily); } @Override public void cleanupMultipart(MultipartHttpServletRequest request) { if (!(request instanceof AbstractMultipartHttpServletRequest) || ((AbstractMultipartHttpServletRequest) request).isResolved()) { // To be on the safe side: explicitly delete the parts, // but only actual file parts (for Resin compatibility) try { for (Part part : request.getParts()) { if (request.getFile(part.getName()) != null) { part.delete(); } } } catch (Throwable ex) { LogFactory.getLog(getClass()).warn("Failed to perform cleanup of multipart items", ex); } } } } public class DispatcherServlet extends FrameworkServlet { @Nullable private MultipartResolver multipartResolver; private void initMultipartResolver(ApplicationContext context) { ... //这个就是配置类配置的StandardServletMultipartResolver文件上传解析器 this.multipartResolver = context.getBean(MULTIPART_RESOLVER_BEAN_NAME, MultipartResolver.class); ... } protected void doDispatch(HttpServletRequest request, HttpServletResponse response) throws Exception { HttpServletRequest processedRequest = request; HandlerExecutionChain mappedHandler = null; boolean multipartRequestParsed = false;//最后finally的回收flag ... try { ModelAndView mv = null; Exception dispatchException = null; try { //做预处理,如果有上传文件 就new StandardMultipartHttpServletRequest包装类 processedRequest = checkMultipart(request); multipartRequestParsed = (processedRequest != request); // Determine handler for the current request. mappedHandler = getHandler(processedRequest); ... // Determine handler adapter for the current request. HandlerAdapter ha = getHandlerAdapter(mappedHandler.getHandler()); ... // Actually invoke the handler. mv = ha.handle(processedRequest, response, mappedHandler.getHandler()); } .... finally { ... if (multipartRequestParsed) { cleanupMultipart(processedRequest); } } } protected HttpServletRequest checkMultipart(HttpServletRequest request) throws MultipartException { if (this.multipartResolver != null && this.multipartResolver.isMultipart(request)) { ... return this.multipartResolver.resolveMultipart(request); ... } } protected void cleanupMultipart(HttpServletRequest request) { if (this.multipartResolver != null) { MultipartHttpServletRequest multipartRequest = WebUtils.getNativeRequest(request, MultipartHttpServletRequest.class); if (multipartRequest != null) { this.multipartResolver.cleanupMultipart(multipartRequest); } } } }
mv = ha.handle(processedRequest, response, mappedHandler.getHandler());跳到以下的类
1
2
3
4
5
6
7
8
9
10
11
12
13
14
15
16
17
18
19
20
21
22
23
24
25
26
27
28
29
30
31
32
33
34
35
36
37
public class RequestMappingHandlerAdapter extends AbstractHandlerMethodAdapter implements BeanFactoryAware, InitializingBean { @Override protected ModelAndView handleInternal(HttpServletRequest request, HttpServletResponse response, HandlerMethod handlerMethod) throws Exception { ModelAndView mav; ... mav = invokeHandlerMethod(request, response, handlerMethod); ... return mav; } @Nullable protected ModelAndView invokeHandlerMethod(HttpServletRequest request, HttpServletResponse response, HandlerMethod handlerMethod) throws Exception { ServletWebRequest webRequest = new ServletWebRequest(request, response); try { WebDataBinderFactory binderFactory = getDataBinderFactory(handlerMethod); ModelFactory modelFactory = getModelFactory(handlerMethod, binderFactory); ServletInvocableHandlerMethod invocableMethod = createInvocableHandlerMethod(handlerMethod); if (this.argumentResolvers != null) {//关注点 invocableMethod.setHandlerMethodArgumentResolvers(this.argumentResolvers); } ... invocableMethod.invokeAndHandle(webRequest, mavContainer); ... return getModelAndView(mavContainer, modelFactory, webRequest); } finally { webRequest.requestCompleted(); } } }
this.argumentResolvers其中主角类RequestPartMethodArgumentResolver用来生成
1
2
3
4
5
6
7
8
9
10
11
12
13
14
15
16
17
18
19
20
21
22
23
24
25
26
27
28
29
30
31
32
33
34
35
36
37
38
39
40
41
42
43
44
45
46
47
48
49
50
51
52
53
54
55
56
57
58
59
60
61
62
63
64
65
66
67
68
69
70
71
72
73
74
75
76
77
78
79
80
81
82
83
84
85
86
87
88
89
90
91
92
93
94
95
96
97
98
99
100
101
102
103
104
105
106
107
108
109
110
111
112
113
114
115
116
117
118
119
120
121
122
123
124
125
126
127
128
129
130
131
132
133
134
135
136
137
138
139
140
141
142
143
144
145
146
147
148
149
150
151
152
153
154
155
156
157
158
159
160
161
162
163
164
165
166
167
168
public class ServletInvocableHandlerMethod extends InvocableHandlerMethod { ... public void invokeAndHandle(ServletWebRequest webRequest, ModelAndViewContainer mavContainer, Object... providedArgs) throws Exception { Object returnValue = invokeForRequest(webRequest, mavContainer, providedArgs); ... } @Nullable public Object invokeForRequest(NativeWebRequest request, @Nullable ModelAndViewContainer mavContainer, Object... providedArgs) throws Exception { Object[] args = getMethodArgumentValues(request, mavContainer, providedArgs); ... return doInvoke(args);//反射调用 } @Nullable protected Object doInvoke(Object... args) throws Exception { Method method = getBridgedMethod(); ReflectionUtils.makeAccessible(method); return method.invoke(getBean(), args); ... } //处理得出multipart参数,准备稍后的反射调用(@PostMapping标记的上传方法) protected Object[] getMethodArgumentValues(NativeWebRequest request, @Nullable ModelAndViewContainer mavContainer, Object... providedArgs) throws Exception { MethodParameter[] parameters = getMethodParameters(); ... Object[] args = new Object[parameters.length]; for (int i = 0; i < parameters.length; i++) { MethodParameter parameter = parameters[i]; parameter.initParameterNameDiscovery(this.parameterNameDiscoverer); args[i] = findProvidedArgument(parameter, providedArgs); if (args[i] != null) { continue; } //关注点1 if (!this.resolvers.supportsParameter(parameter)) { throw new IllegalStateException(formatArgumentError(parameter, "No suitable resolver")); } try { //关注点2 args[i] = this.resolvers.resolveArgument(parameter, mavContainer, request, this.dataBinderFactory); } catch (Exception ex) { ... } } return args; } } public class RequestPartMethodArgumentResolver extends AbstractMessageConverterMethodArgumentResolver { //对应上面代码关注点1 @Override public boolean supportsParameter(MethodParameter parameter) { //标注@RequestPart的参数 if (parameter.hasParameterAnnotation(RequestPart.class)) { return true; } else { if (parameter.hasParameterAnnotation(RequestParam.class)) { return false; } return MultipartResolutionDelegate.isMultipartArgument(parameter.nestedIfOptional()); } } //对应上面代码关注点2 @Override @Nullable public Object resolveArgument(MethodParameter parameter, @Nullable ModelAndViewContainer mavContainer, NativeWebRequest request, @Nullable WebDataBinderFactory binderFactory) throws Exception { HttpServletRequest servletRequest = request.getNativeRequest(HttpServletRequest.class); Assert.state(servletRequest != null, "No HttpServletRequest"); RequestPart requestPart = parameter.getParameterAnnotation(RequestPart.class); boolean isRequired = ((requestPart == null || requestPart.required()) && !parameter.isOptional()); String name = getPartName(parameter, requestPart); parameter = parameter.nestedIfOptional(); Object arg = null; //封装成MultipartFile类型的对象作参数 Object mpArg = MultipartResolutionDelegate.resolveMultipartArgument(name, parameter, servletRequest); if (mpArg != MultipartResolutionDelegate.UNRESOLVABLE) { arg = mpArg; } ... return adaptArgumentIfNecessary(arg, parameter); } } public final class MultipartResolutionDelegate { ... @Nullable public static Object resolveMultipartArgument(String name, MethodParameter parameter, HttpServletRequest request) throws Exception { MultipartHttpServletRequest multipartRequest = WebUtils.getNativeRequest(request, MultipartHttpServletRequest.class); boolean isMultipart = (multipartRequest != null || isMultipartContent(request)); if (MultipartFile.class == parameter.getNestedParameterType()) { if (!isMultipart) { return null; } if (multipartRequest == null) { multipartRequest = new StandardMultipartHttpServletRequest(request); } return multipartRequest.getFile(name); } else if (isMultipartFileCollection(parameter)) { if (!isMultipart) { return null; } if (multipartRequest == null) { multipartRequest = new StandardMultipartHttpServletRequest(request); } List<MultipartFile> files = multipartRequest.getFiles(name); return (!files.isEmpty() ? files : null); } else if (isMultipartFileArray(parameter)) { if (!isMultipart) { return null; } if (multipartRequest == null) { multipartRequest = new StandardMultipartHttpServletRequest(request); } List<MultipartFile> files = multipartRequest.getFiles(name); return (!files.isEmpty() ? files.toArray(new MultipartFile[0]) : null); } else if (Part.class == parameter.getNestedParameterType()) { if (!isMultipart) { return null; } return request.getPart(name); } else if (isPartCollection(parameter)) { if (!isMultipart) { return null; } List<Part> parts = resolvePartList(request, name); return (!parts.isEmpty() ? parts : null); } else if (isPartArray(parameter)) { if (!isMultipart) { return null; } List<Part> parts = resolvePartList(request, name); return (!parts.isEmpty() ? parts.toArray(new Part[0]) : null); } else { return UNRESOLVABLE; } } ... }
8、异常处理
1.错误处理-SpringBoot默认错误处理机制
Spring Boot官方文档 - Error Handling
默认规则 :
默认情况下,Spring Boot提供/error处理所有错误的映射
对于机器客户端,它将生成JSON响应,其中包含错误,HTTP状态和异常消息的详细信息。
对于浏览器客户端,响应一个“ whitelabel”错误视图,以HTML格式呈现相同的数据
1
2
3
4
5
6
7
{ "timestamp": "2020-11-22T05:53:28.416+00:00", "status": 404, "error": "Not Found", "message": "No message available", "path": "/asadada" }
要对其进行自定义,添加View解析为error
要完全替换默认行为,可以实现 ErrorController并注册该类型的Bean定义,或添加ErrorAttributes类型的组件以使用现有机制但替换其内容。
/templates/error/下的4xx,5xx页面会被自动解析
自定义错误页面的做法
也可以获取错误信息:
1
2
3
<h3 th:text="${message}">Something went wrong.</h3> <p class="nrml-txt" th:text="${trace}">Why not try refreshing you page? Or you can <a href="#">contact our support</a> if the problem persists.</p> <a class="back-btn" href="index.html" th:text="${status}"> Back To Home</a>
2.异常处理自动配置原理
ErrorMvcAutoConfiguration 自动配置异常处理规则
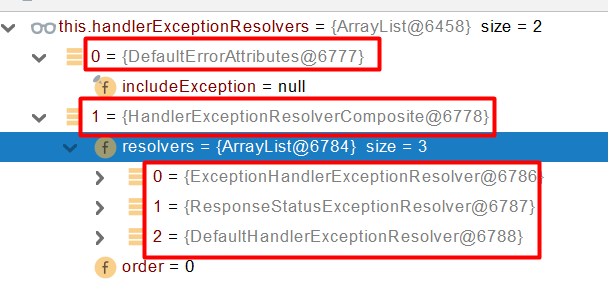
容器中的组件 :类型:DefaultErrorAttributes -> id:errorAttributes
public class DefaultErrorAttributes implements ErrorAttributes, HandlerExceptionResolver
DefaultErrorAttributes:定义错误页面中可以包含数据(异常明细,堆栈信息等)。
容器中的组件 :类型:BasicErrorController --> id:basicErrorController(json+白页 适配响应)
处理默认 /error 路径的请求
,页面响应
1 new ModelAndView("error", model);
容器中的组件 :类型:DefaultErrorViewResolver -> id:conventionErrorViewResolver
3.异常处理流程
大致流程
执行目标方法,目标方法运行期间有任何异常都会被catch、而且标志当前请求结束;并且用dispatchException
进入视图解析流程(页面渲染?)
processDispatchResult(processedRequest, response, mappedHandler, mv, dispatchException);
mv = processHandlerException; 处理handler发生的异常,处理完成返回ModelAndView;
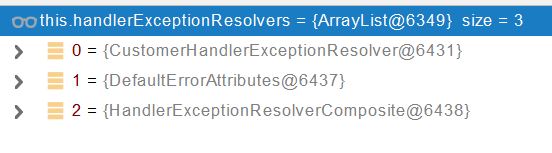
遍历所有的handlerExceptionResolvers, 看谁能处理当前异常
HandlerExceptionResolver处理器异常解析器
系统默认的 异常解析器;
DefaultErrorAttributes先来处理异常。把异常信息保存到rrequest域,并且返回null;
默认没有任何人能处理异常,所以异常会被抛出
如果没有任何人能处理最终底层就会发送/error 请求。会被底层的BasicErrorController处理
解析错误视图;遍历所有的 ErrorViewResolver 看谁能解析。
默认的 DefaultErrorViewResolver ,作用是把响应状态码作为错误页的地址拼接成error/500.html
模板引擎最终响应这个页面error/500.html
示例
譬如写一个会抛出异常的控制层:
1
2
3
4
5
6
7
8
9
10
11
@Slf4j @RestController public class HelloController { @RequestMapping("/hello") public String handle01(){ int i = 1 / 0;//将会抛出ArithmeticException log.info("Hello, Spring Boot 2!"); return "Hello, Spring Boot 2!"; } }
当浏览器发出/hello请求,
1 DispatcherServlet`的`doDispatch()`的`mv = ha.handle(processedRequest, response, mappedHandler.getHandler());
将会抛出ArithmeticException。
方法执行期间抛出任何异常都会被catch , 而且标注定钱请求结束,并且用dispatchException
1
2
3
4
5
6
7
8
9
10
11
12
13
14
15
16
17
18
19
20
21
22
23
24
25
26
27
28
29
30
31
32
33
34
35
36
37
38
39
40
41
42
43
44
45
46
47
48
49
50
51
52
53
54
55
56
57
58
59
60
61
62
63
64
65
66
67
68
69
70
71
72
73
74
75
76
public class DispatcherServlet extends FrameworkServlet { ... protected void doDispatch(HttpServletRequest request, HttpServletResponse response) throws Exception { ... // Actually invoke the handler. //将会抛出ArithmeticException mv = ha.handle(processedRequest, response, mappedHandler.getHandler()); applyDefaultViewName(processedRequest, mv); mappedHandler.applyPostHandle(processedRequest, response, mv); } catch (Exception ex) { //将会捕捉ArithmeticException dispatchException = ex; } catch (Throwable err) { ... } //捕捉后,继续运行 processDispatchResult(processedRequest, response, mappedHandler, mv, dispatchException); } catch (Exception ex) { triggerAfterCompletion(processedRequest, response, mappedHandler, ex); } catch (Throwable err) { triggerAfterCompletion(processedRequest, response, mappedHandler, new NestedServletException("Handler processing failed", err)); } finally { ... } } private void processDispatchResult(HttpServletRequest request, HttpServletResponse response, @Nullable HandlerExecutionChain mappedHandler, @Nullable ModelAndView mv, @Nullable Exception exception) throws Exception { boolean errorView = false; if (exception != null) { if (exception instanceof ModelAndViewDefiningException) { ... } else { Object handler = (mappedHandler != null ? mappedHandler.getHandler() : null); //ArithmeticException将在这处理 mv = processHandlerException(request, response, handler, exception); errorView = (mv != null); } } ... } protected ModelAndView processHandlerException(HttpServletRequest request, HttpServletResponse response, @Nullable Object handler, Exception ex) throws Exception { // Success and error responses may use different content types request.removeAttribute(HandlerMapping.PRODUCIBLE_MEDIA_TYPES_ATTRIBUTE); // Check registered HandlerExceptionResolvers... ModelAndView exMv = null; if (this.handlerExceptionResolvers != null) { //遍历所有的 handlerExceptionResolvers,看谁能处理当前异常HandlerExceptionResolver处理器异常解析器 for (HandlerExceptionResolver resolver : this.handlerExceptionResolvers) { exMv = resolver.resolveException(request, response, handler, ex); if (exMv != null) { break; } } } ... //若只有系统的自带的异常解析器(没有自定义的),异常还是会抛出 throw ex; } }
系统自带的异常解析器 :
DefaultErrorAttributes先来处理异常,它主要功能把异常信息保存到request域,并且返回null。
1
2
3
4
5
6
7
8
9
10
11
12
13
public class DefaultErrorAttributes implements ErrorAttributes, HandlerExceptionResolver, Ordered { ... public ModelAndView resolveException(HttpServletRequest request, HttpServletResponse response, Object handler, Exception ex) { this.storeErrorAttributes(request, ex); return null; } private void storeErrorAttributes(HttpServletRequest request, Exception ex) { request.setAttribute(ERROR_ATTRIBUTE, ex);//把异常信息保存到request域 } ... }
默认没有任何解析器(上图的HandlerExceptionResolverComposite)能处理异常,所以最后异常会被抛出。
最终底层就会转发/error 请求。会被底层的BasicErrorController处理。
1
2
3
4
5
6
7
8
9
10
11
12
13
14
15
16
17
18
19
20
21
22
23
24
25
26
27
28
29
30
31
32
33
34
35
36
37
38
39
40
41
42
43
44
45
46
47
48
49
50
51
52
53
54
55
56
57
58
59
60
61
62
63
64
65
66
67
68
69
70
71
72
73
74
75
76
77
78
79
80
81
82
83
84
85
86
87
88
89
90
91
92
93
94
95
96
97
98
99
100
101
102
103
104
105
106
107
108
109
110
111
112
113
114
115
116
117
118
119
120
121
122
123
124
125
126
127
128
129
130
131
132
133
134
135
136
137
138
139
140
141
142
143
144
145
146
147
148
149
150
151
152
153
154
155
156
157
158
159
160
161
162
163
164
165
166
167
168
169
170
171
172
@Controller @RequestMapping("${server.error.path:${error.path:/error}}") public class BasicErrorController extends AbstractErrorController { @RequestMapping(produces = MediaType.TEXT_HTML_VALUE) public ModelAndView errorHtml(HttpServletRequest request, HttpServletResponse response) { HttpStatus status = getStatus(request); Map<String, Object> model = Collections .unmodifiableMap(getErrorAttributes(request, getErrorAttributeOptions(request, MediaType.TEXT_HTML))); response.setStatus(status.value()); ModelAndView modelAndView = resolveErrorView(request, response, status, model); //如果/template/error内没有4**.html或5**.html, //modelAndView为空,最终还是返回viewName为error的modelAndView return (modelAndView != null) ? modelAndView : new ModelAndView("error", model); } ... } protected void doDispatch(HttpServletRequest request, HttpServletResponse response) throws Exception { ... protected void doDispatch(HttpServletRequest request, HttpServletResponse response) throws Exception { ... // Actually invoke the handler. mv = ha.handle(processedRequest, response, mappedHandler.getHandler()); ... //渲染页面 processDispatchResult(processedRequest, response, mappedHandler, mv, dispatchException); ... } private void processDispatchResult(HttpServletRequest request, HttpServletResponse response, @Nullable HandlerExecutionChain mappedHandler, @Nullable ModelAndView mv, @Nullable Exception exception) throws Exception { boolean errorView = false; ... // Did the handler return a view to render? if (mv != null && !mv.wasCleared()) { render(mv, request, response); if (errorView) { WebUtils.clearErrorRequestAttributes(request); } } ... } protected void render(ModelAndView mv, HttpServletRequest request, HttpServletResponse response) throws Exception { ... View view; String viewName = mv.getViewName(); if (viewName != null) { // We need to resolve the view name. //找出合适error的View,如果/template/error内没有4**.html或5**.html, //将会返回默认异常页面ErrorMvcAutoConfiguration.StaticView //这里按需深究代码吧! view = resolveViewName(viewName, mv.getModelInternal(), locale, request); ... } ... try { if (mv.getStatus() != null) { response.setStatus(mv.getStatus().value()); } //看下面代码块的StaticView的render块 view.render(mv.getModelInternal(), request, response); } catch (Exception ex) { ... } } } @Configuration(proxyBeanMethods = false) @ConditionalOnWebApplication(type = Type.SERVLET) @ConditionalOnClass({ Servlet.class, DispatcherServlet.class }) // Load before the main WebMvcAutoConfiguration so that the error View is available @AutoConfigureBefore(WebMvcAutoConfiguration.class) @EnableConfigurationProperties({ ServerProperties.class, ResourceProperties.class, WebMvcProperties.class }) public class ErrorMvcAutoConfiguration { ... @Configuration(proxyBeanMethods = false) @ConditionalOnProperty(prefix = "server.error.whitelabel", name = "enabled", matchIfMissing = true) @Conditional(ErrorTemplateMissingCondition.class) protected static class WhitelabelErrorViewConfiguration { //将创建一个名为error的系统默认异常页面View的Bean private final StaticView defaultErrorView = new StaticView(); @Bean(name = "error") @ConditionalOnMissingBean(name = "error") public View defaultErrorView() { return this.defaultErrorView; } // If the user adds @EnableWebMvc then the bean name view resolver from // WebMvcAutoConfiguration disappears, so add it back in to avoid disappointment. @Bean @ConditionalOnMissingBean public BeanNameViewResolver beanNameViewResolver() { BeanNameViewResolver resolver = new BeanNameViewResolver(); resolver.setOrder(Ordered.LOWEST_PRECEDENCE - 10); return resolver; } } private static class StaticView implements View { private static final MediaType TEXT_HTML_UTF8 = new MediaType("text", "html", StandardCharsets.UTF_8); private static final Log logger = LogFactory.getLog(StaticView.class); @Override public void render(Map<String, ?> model, HttpServletRequest request, HttpServletResponse response) throws Exception { if (response.isCommitted()) { String message = getMessage(model); logger.error(message); return; } response.setContentType(TEXT_HTML_UTF8.toString()); StringBuilder builder = new StringBuilder(); Object timestamp = model.get("timestamp"); Object message = model.get("message"); Object trace = model.get("trace"); if (response.getContentType() == null) { response.setContentType(getContentType()); } //系统默认异常页面html代码 builder.append("<html><body><h1>Whitelabel Error Page</h1>").append( "<p>This application has no explicit mapping for /error, so you are seeing this as a fallback.</p>") .append("<div id='created'>").append(timestamp).append("</div>") .append("<div>There was an unexpected error (type=").append(htmlEscape(model.get("error"))) .append(", status=").append(htmlEscape(model.get("status"))).append(").</div>"); if (message != null) { builder.append("<div>").append(htmlEscape(message)).append("</div>"); } if (trace != null) { builder.append("<div style='white-space:pre-wrap;'>").append(htmlEscape(trace)).append("</div>"); } builder.append("</body></html>"); response.getWriter().append(builder.toString()); } private String htmlEscape(Object input) { return (input != null) ? HtmlUtils.htmlEscape(input.toString()) : null; } private String getMessage(Map<String, ?> model) { Object path = model.get("path"); String message = "Cannot render error page for request [" + path + "]"; if (model.get("message") != null) { message += " and exception [" + model.get("message") + "]"; } message += " as the response has already been committed."; message += " As a result, the response may have the wrong status code."; return message; } @Override public String getContentType() { return "text/html"; } } }
4.Springboot异常处理的五种方式
1️⃣自定义错误页
error/404.html error/5xx.html;有精确的错误状态码页面就匹配精确,没有就找 4xx.html;如果都没有就触发白页
注意要在拦截器处放行
2️⃣@ControllerAdvice+@ExceptionHandler处理全局异常
底层是 ExceptionHandlerExceptionResolver 支持的
GlobalExceptionHandler.java
1
2
3
4
5
6
7
8
9
10
11
@Slf4j @ControllerAdvice public class GlobalExceptionHandler { //处理全局异常 @ExceptionHandler({ArithmeticException.class,NullPointerException.class}) //处理数学运算异常以及空指针异常 public String handleArithException(Exception e){ log.error("异常是:{}",e); return "login"; //视图地址 } }
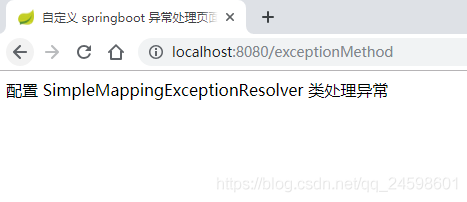
3️⃣配置 SimpleMappingExceptionResolver 类处理异常
Springboot异常处理的五种方式——SpringBoot学习_lytao123的博客-CSDN博客_springboot异常处理 (gitcode.net)
通过配置 SimpleMappingExceptionResolver 类处理异常也是全局范围的,通过将 SimpleMappingExceptionResolver 类注入到 Spring 容器。
1
2
3
4
5
6
7
8
9
10
11
12
13
14
15
16
17
18
19
20
21
22
23
24
25
26
27
28
29
package com.config; import java.util.Properties; import org.springframework.context.annotation.Bean; import org.springframework.context.annotation.Configuration; import org.springframework.web.servlet.handler.SimpleMappingExceptionResolver; @Configuration public class GlobalException { @Bean public SimpleMappingExceptionResolver getSimpleMappingExceptionResolver(){ SimpleMappingExceptionResolver resolver = new SimpleMappingExceptionResolver(); Properties mappings = new Properties(); /* * 参数一:异常的类型,注意必须是异常类型的全名 * 参数二:视图名称 */ mappings.put("java.lang.ArithmeticException", "errors"); //设置异常与视图映射信息的 resolver.setExceptionMappings(mappings); return resolver; } }
注意:在类上加上 @Configuration 注解,在方法上加上 @Bean 注解,方法返回值必须是 SimpleMappingExceptionResolver 。
编写 errors.html 页面
1
2
3
4
5
6
7
8
9
10
11
<!DOCTYPE html> <html> <head> <meta charset="UTF-8"> <title>自定义 springboot 异常处理页面</title> </head> <body> 配置 SimpleMappingExceptionResolver 类处理异常 </body> </html> 12345678910
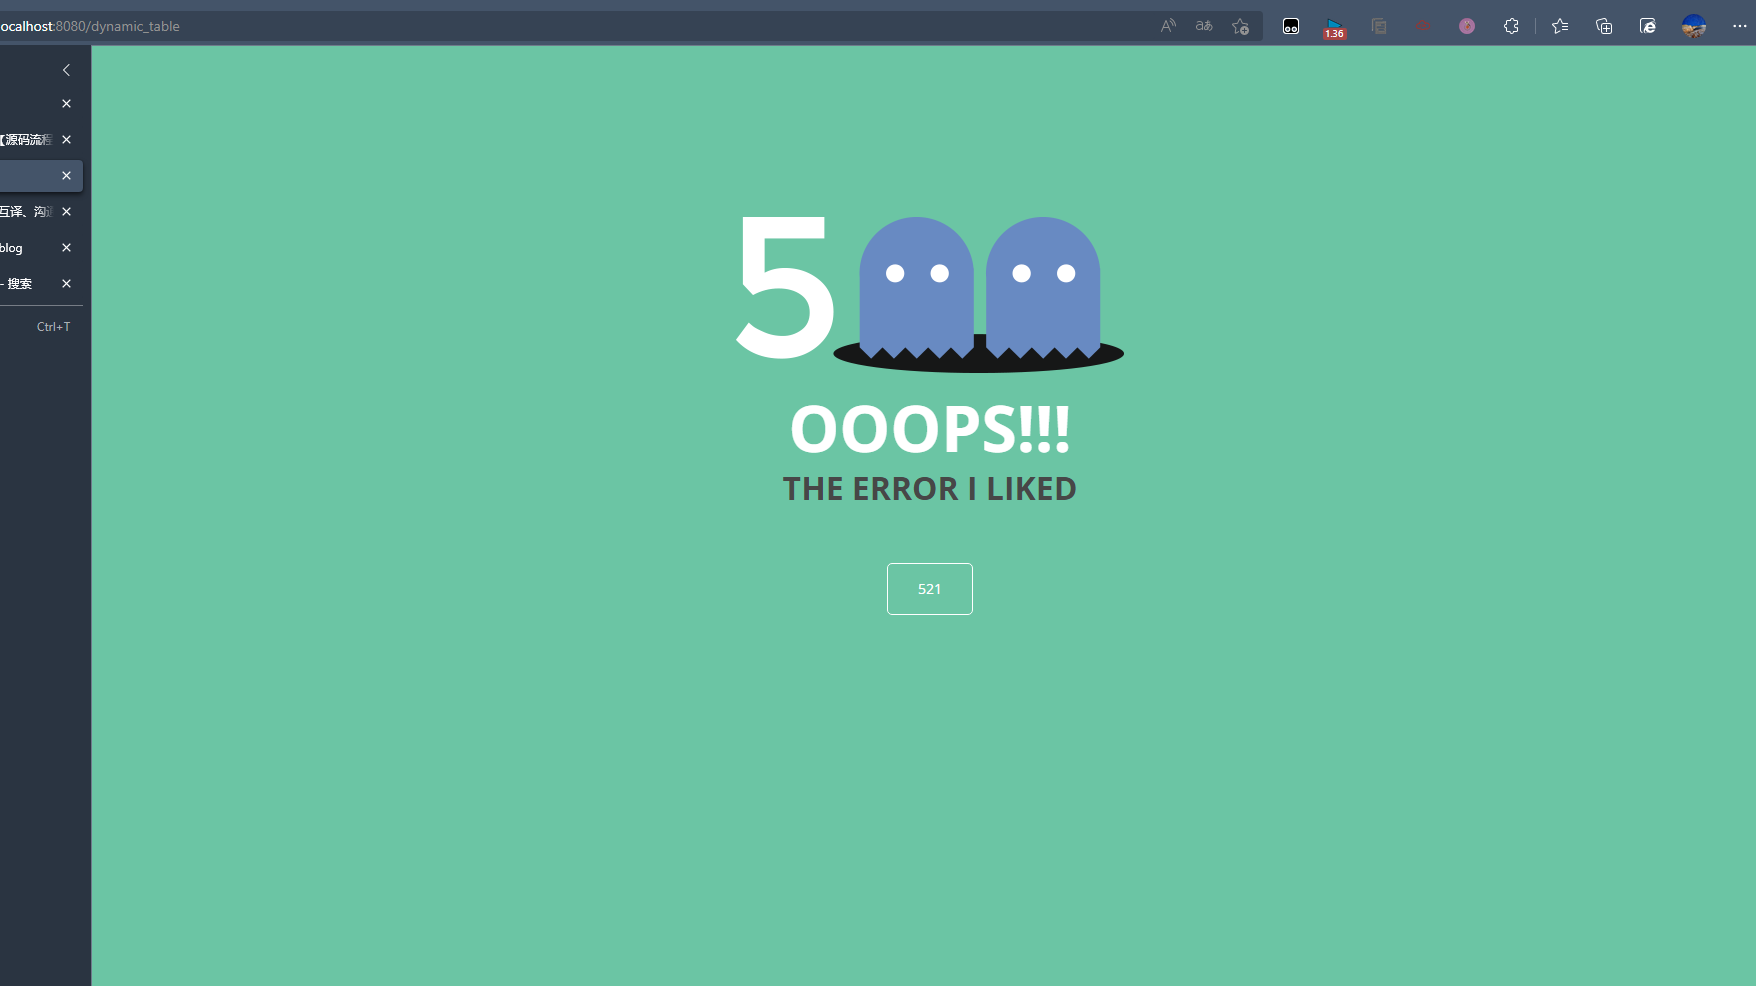
访问 http://localhost:8080/exceptionMethod 链接后抛出 ArithmeticException 异常,跳转到 errors.html 页面,效果图如下所示:
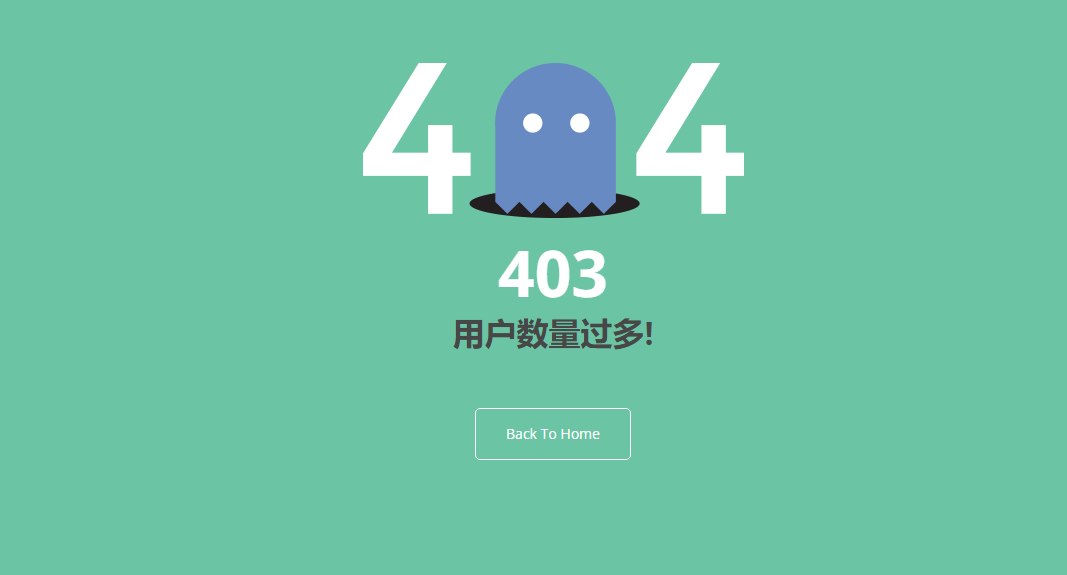
@ResponseStatus自定义异常
底层是 ResponseStatusExceptionResolver ,
把responsestatus注解的信息底层调用response.sendError(statusCode, resolvedReason);tomcat发送的/error
UserTooManyException.java
1
2
3
4
5
6
7
8
9
10
@ResponseStatus(value= HttpStatus.FORBIDDEN,reason = "用户数量太多") public class UserTooManyException extends RuntimeException { public UserTooManyException(){ } public UserTooManyException(String message){ super(message); } }
TableController.java
1
2
3
4
5
6
7
8
9
10
11
12
13
14
15
16
17
18
19
@Controller public class TableController { ..... @GetMapping("/dynamic_table") public String dynamic_table(Model model) throws UserTooManyException { // 表格内容的遍历 List<User> users = Arrays.asList(new User("Vsa", "3423443"), new User("Ads", "3erwefg12"), new User("BSd", "rw5efg12"), new User("Arq", "3454343")); model.addAttribute("users",users); if(users.size()>=3){ throw new UserTooManyException("overMaxSession"); } return "table/dynamic_table"; } .... }
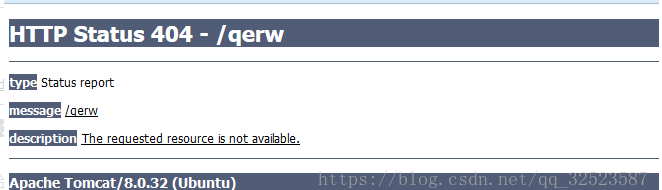
Spring底层的异常
如 参数 类型转换异常
DefaultHandlerExceptionResolver 处理框架底层的异常。response.sendError(HttpServletResponse.SC_BAD_REQUEST, ex.getMessage());
如果不处理 , 就会显示Tomcat默认的错误页
4️⃣自定义实现HandlerExceptionResolver处理异常
1
2
3
4
5
6
7
8
9
10
11
12
13
14
15
@Order(value= Ordered.HIGHEST_PRECEDENCE) //优先级,数字越小优先级越高 @Component public class CustomerHandlerExceptionResolver implements HandlerExceptionResolver { @Override public ModelAndView resolveException(HttpServletRequest request, HttpServletResponse response, Object handler, Exception ex) { try { response.sendError(521,"The error I liked"); } catch (IOException e) { e.printStackTrace(); } return new ModelAndView(); } }
5️⃣ErrorViewResolver 实现自定义处理异常
ErrorViewResolver 实现自定义处理异常
response.sendError(),error请求就会转给controller你的异常没有任何人能处理,tomcat底层调用response.sendError(),error请求就会转给controller
basicErrorController 要去的页面地址是 ErrorViewResolver
1
2
3
4
5
6
7
8
9
10
11
12
13
14
15
16
17
18
19
20
21
22
23
24
25
26
27
28
29
30
31
@Controller @RequestMapping("${server.error.path:${error.path:/error}}") public class BasicErrorController extends AbstractErrorController { ... @RequestMapping(produces = MediaType.TEXT_HTML_VALUE) public ModelAndView errorHtml(HttpServletRequest request, HttpServletResponse response) { HttpStatus status = getStatus(request); Map<String, Object> model = Collections .unmodifiableMap(getErrorAttributes(request, getErrorAttributeOptions(request, MediaType.TEXT_HTML))); response.setStatus(status.value()); ModelAndView modelAndView = resolveErrorView(request, response, status, model); return (modelAndView != null) ? modelAndView : new ModelAndView("error", model); } protected ModelAndView resolveErrorView(HttpServletRequest request, HttpServletResponse response, HttpStatus status, Map<String, Object> model) { //这里用到ErrorViewResolver接口 for (ErrorViewResolver resolver : this.errorViewResolvers) { ModelAndView modelAndView = resolver.resolveErrorView(request, status, model); if (modelAndView != null) { return modelAndView; } } return null; } ... }
ErrorViewResolver.java
1
2
3
4
5
6
@FunctionalInterface public interface ErrorViewResolver { ModelAndView resolveErrorView(HttpServletRequest request, HttpStatus status, Map<String, Object> model); }
9、原生组件注入
1.原生注解与Spring方式注入
官方文档 - Servlets, Filters, and listeners
使用Servlet API
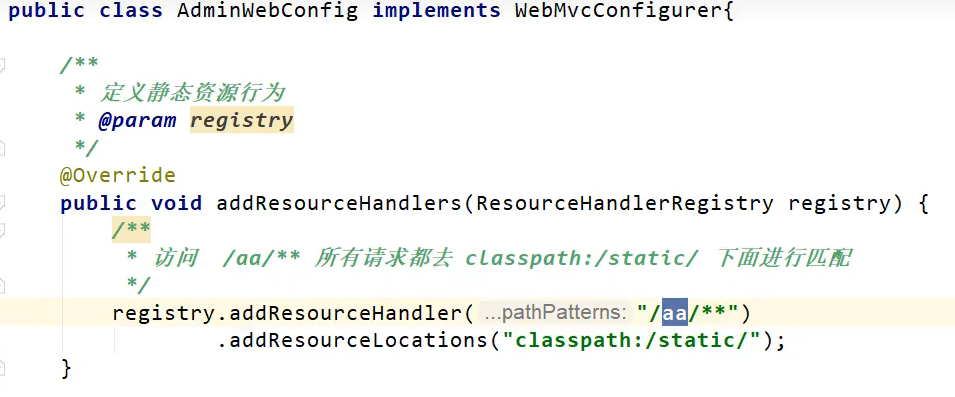
@ServletComponentScan(basePackages = {"pers.dhx_.admin"})指定原生的Servlet在哪里
1
2
3
@WebServlet("/mySerlvet") @WebFilter @WebListener
MyServlet.java
1
2
3
4
5
6
7
8
@WebServlet(urlPatterns = "/my") public class MyServlet extends HttpServlet { @Override protected void doGet(HttpServletRequest req, HttpServletResponse resp) throws ServletException, IOException { resp.getWriter().write("66666"); } }
注意需要在application类里面加上@ServletComponentScan 让springboot吧我们写的Servlet扫描进去
1
2
3
4
5
6
7
@ServletComponentScan(basePackages = {"pers.dhx_.admin"}) // 可以自动将我们写的servlet扫描进来 @SpringBootApplication public class Demo04AdminApplication { public static void main(String[] args) { SpringApplication.run(Demo04AdminApplication.class, args); } }
MyFilter.java
1
2
3
4
5
6
7
8
9
10
11
12
13
14
15
16
17
18
19
20
21
@Slf4j @WebFilter(urlPatterns = {"/css/*","/images/*"})// 单个*是Servlet的写法,/**是spring里面的写法 public class MyFilter implements Filter { @Override public void init(FilterConfig filterConfig) throws ServletException { log.info("Filter init"); Filter.super.init(filterConfig); } @Override public void doFilter(ServletRequest servletRequest, ServletResponse servletResponse, FilterChain filterChain) throws IOException, ServletException { log.info("Filter working"); filterChain.doFilter(servletRequest,servletResponse); } @Override public void destroy() { log.info("Filter destroy"); Filter.super.destroy(); } }
MyServletContextListener.java
1
2
3
4
5
6
7
8
9
10
11
12
13
14
15
@Slf4j @WebListener public class MyServletContextListener implements ServletContextListener { @Override public void contextInitialized(ServletContextEvent sce) { log.info("MySwervletContextListener监听到项目初始化完成"); } @Override public void contextDestroyed(ServletContextEvent sce) { log.info("MySwervletContextListener监听到项目销毁"); } }
最后还要在主启动类添加注解@ServletComponentScan
1
2
3
4
5
6
7
8
@ServletComponentScan(basePackages = "com.lun")// @SpringBootApplication(exclude = RedisAutoConfiguration.class) public class Boot05WebAdminApplication { public static void main(String[] args) { SpringApplication.run(Boot05WebAdminApplication.class, args); } }
如果多个Servlet都能处理到同一层路径, 按照精确优先原则
比如当前有DispatcherServlet 以及 MyServlet 分别接收 / 以及 /my ,
如果我们发送/my请求, 那么这个请求就会优先交给MyServlet来处理
Spring方式注入
使用RegistrationBean
Spring Boot提供的针对Servlet 3.0+容器的注册bean基类。
该类的目的是用于向Servlet容器(Tomcat,Jetty等)注册工作组件,比如Servlet,Filter或者EventListener。
这是一个抽象基类,实现了接口ServletContextInitializer。ServletContextInitializer约定了当前RegistrationBean会在Servlet启动时被调用方法#onStartup。
该抽象基类提供了如下功能:
当前注册bean的优先级,通过属性order指定,缺省值为最低优先级Ordered.LOWEST_PRECEDENCE。
当前注册bean是否被禁用,通过属性enabled指定。如果被禁用,Servlet容器启动时并不执行该注册bean的注册动作。缺省值为true。
通过抽象方法的方式约定了实现子类必须实现某些功能,比如具体注册什么以及具体的注册逻辑都必须由子类实现提供。
ServletRegistrationBeanFilterRegistrationBeanServletListenerRegistrationBean
proxyBeanMethods = true 表示这个配置类被代理了,false则不被代理。
当为true时,你无论调用几次,它永远上是同一个对象。
1
2
3
4
5
6
7
8
9
10
11
12
13
14
15
16
17
18
19
20
21
22
23
24
25
26
@Configuration(proxyBeanMethods = true) // public class MyRegistConfig { @Bean public ServletRegistrationBean myServlet(){ MyServlet myServlet = new MyServlet(); return new ServletRegistrationBean(myServlet,"/my","/my02"); } @Bean public FilterRegistrationBean myFilter(){ MyFilter myFilter = new MyFilter(); // return new FilterRegistrationBean(myFilter,myServlet()); FilterRegistrationBean filterRegistrationBean = new FilterRegistrationBean(myFilter); filterRegistrationBean.setUrlPatterns(Arrays.asList("/my","/css/*")); return filterRegistrationBean; } @Bean public ServletListenerRegistrationBean myListener(){ MyServletContextListener mySwervletContextListener = new MyServletContextListener(); return new ServletListenerRegistrationBean(mySwervletContextListener); } }
2.DispatcherServlet注入原理
org.springframework.boot.autoconfigure.web.servlet.DispatcherServletAutoConfiguration配置类
1
2
3
4
5
6
7
8
9
10
11
12
13
14
15
16
17
18
19
20
21
22
23
24
25
26
27
28
29
30
31
32
33
34
35
36
37
38
39
40
41
42
43
44
45
46
47
48
49
50
51
52
53
54
55
56
57
58
59
60
61
62
63
64
65
66
67
68
69
@AutoConfigureOrder(Ordered.HIGHEST_PRECEDENCE) @Configuration(proxyBeanMethods = false) @ConditionalOnWebApplication(type = Type.SERVLET) @ConditionalOnClass(DispatcherServlet.class) @AutoConfigureAfter(ServletWebServerFactoryAutoConfiguration.class) public class DispatcherServletAutoConfiguration { /* * The bean name for a DispatcherServlet that will be mapped to the root URL "/" */ public static final String DEFAULT_DISPATCHER_SERVLET_BEAN_NAME = "dispatcherServlet"; /* * The bean name for a ServletRegistrationBean for the DispatcherServlet "/" */ public static final String DEFAULT_DISPATCHER_SERVLET_REGISTRATION_BEAN_NAME = "dispatcherServletRegistration"; @Configuration(proxyBeanMethods = false) @Conditional(DefaultDispatcherServletCondition.class) @ConditionalOnClass(ServletRegistration.class) @EnableConfigurationProperties(WebMvcProperties.class) protected static class DispatcherServletConfiguration { //创建DispatcherServlet类的Bean @Bean(name = DEFAULT_DISPATCHER_SERVLET_BEAN_NAME) public DispatcherServlet dispatcherServlet(WebMvcProperties webMvcProperties) { DispatcherServlet dispatcherServlet = new DispatcherServlet(); dispatcherServlet.setDispatchOptionsRequest(webMvcProperties.isDispatchOptionsRequest()); dispatcherServlet.setDispatchTraceRequest(webMvcProperties.isDispatchTraceRequest()); dispatcherServlet.setThrowExceptionIfNoHandlerFound(webMvcProperties.isThrowExceptionIfNoHandlerFound()); dispatcherServlet.setPublishEvents(webMvcProperties.isPublishRequestHandledEvents()); dispatcherServlet.setEnableLoggingRequestDetails(webMvcProperties.isLogRequestDetails()); return dispatcherServlet; } @Bean @ConditionalOnBean(MultipartResolver.class) @ConditionalOnMissingBean(name = DispatcherServlet.MULTIPART_RESOLVER_BEAN_NAME) public MultipartResolver multipartResolver(MultipartResolver resolver) { // Detect if the user has created a MultipartResolver but named it incorrectly return resolver; } } @Configuration(proxyBeanMethods = false) @Conditional(DispatcherServletRegistrationCondition.class) @ConditionalOnClass(ServletRegistration.class) @EnableConfigurationProperties(WebMvcProperties.class) @Import(DispatcherServletConfiguration.class) protected static class DispatcherServletRegistrationConfiguration { //注册DispatcherServlet类 @Bean(name = DEFAULT_DISPATCHER_SERVLET_REGISTRATION_BEAN_NAME) @ConditionalOnBean(value = DispatcherServlet.class, name = DEFAULT_DISPATCHER_SERVLET_BEAN_NAME) public DispatcherServletRegistrationBean dispatcherServletRegistration(DispatcherServlet dispatcherServlet, WebMvcProperties webMvcProperties, ObjectProvider<MultipartConfigElement> multipartConfig) { DispatcherServletRegistrationBean registration = new DispatcherServletRegistrationBean(dispatcherServlet, webMvcProperties.getServlet().getPath()); registration.setName(DEFAULT_DISPATCHER_SERVLET_BEAN_NAME); registration.setLoadOnStartup(webMvcProperties.getServlet().getLoadOnStartup()); multipartConfig.ifAvailable(registration::setMultipartConfig); return registration; } } ... }
DispatcherServlet默认映射的是 / 路径,可以通过在配置文件修改spring.mvc.servlet.path=/mvc。
10、嵌入式Servlet容器
1.切换web服务器与定制化
默认支持的WebServer
Tomcat, Jetty, or Undertow。ServletWebServerApplicationContext容器启动寻找ServletWebServerFactory 并引导创建服务器。
原理
SpringBoot应用启动发现当前是Web应用,web场景包-导入tomcat。
web应用会创建一个web版的IOC容器 ServletWebServerApplicationContext 。
ServletWebServerApplicationContext 启动的时候寻找 ServletWebServerFactory (Servlet 的web服务器工厂——>Servlet 的web服务器)。
SpringBoot底层默认有很多的WebServer工厂(
1 ServletWebServerFactoryConfiguration
内创建Bean),如:
TomcatServletWebServerFactoryJettyServletWebServerFactoryUndertowServletWebServerFactory
底层直接会有一个自动配置类ServletWebServerFactoryAutoConfiguration。
ServletWebServerFactoryAutoConfiguration导入了ServletWebServerFactoryConfiguration(配置类)。
ServletWebServerFactoryConfiguration根据动态判断系统中到底导入了那个Web服务器的包。(默认是web-starter导入tomcat包),容器中就有 TomcatServletWebServerFactory
TomcatServletWebServerFactory创建出Tomcat服务器并启动;TomcatWebServer 的构造器拥有初始化方法initialize——this.tomcat.start();
内嵌服务器,与以前手动把启动服务器相比,改成现在使用代码启动(tomcat核心jar包存在)。
Spring Boot默认使用Tomcat服务器,若需更改其他服务器,则修改工程pom.xml:
1
2
3
4
5
6
7
8
9
10
11
12
13
14
15
<dependency> <groupId>org.springframework.boot</groupId> <artifactId>spring-boot-starter-web</artifactId> <exclusions> <exclusion> <groupId>org.springframework.boot</groupId> <artifactId>spring-boot-starter-tomcat</artifactId> </exclusion> </exclusions> </dependency> <dependency> <groupId>org.springframework.boot</groupId> <artifactId>spring-boot-starter-jetty</artifactId> </dependency>
官方文档 - Use Another Web Server
2.定制Servlet容器
实现WebServerFactoryCustomizer<ConfigurableServletWebServerFactory>
把配置文件的值和ServletWebServerFactory进行绑定
修改配置文件 server.xxx
直接自定义 ConfigurableServletWebServerFactory
xxxxxCustomizer:定制化器,可以改变xxxx的默认规则
1
2
3
4
5
6
7
8
9
10
11
12
13
import org.springframework.boot.web.server.WebServerFactoryCustomizer; import org.springframework.boot.web.servlet.server.ConfigurableServletWebServerFactory; import org.springframework.stereotype.Component; @Component public class CustomizationBean implements WebServerFactoryCustomizer<ConfigurableServletWebServerFactory> { @Override public void customize(ConfigurableServletWebServerFactory server) { server.setPort(9000); } }
11、定制化原理
定制化的常见方式
修改配置文件
xxxxxCustomizer
编写自定义的配置类 xxxConfiguration + @Bean替换、增加容器中默认组件,视图解析器
Web应用 编写一个配置类实现 WebMvcConfigurer 即可定制化web功能 + @Bean给容器中再扩展一些组件
一般就是这样写
1
2
3
@Configuration public class AdminWebConfig implements WebMvcConfigurer{ }
@EnableWebMvc + WebMvcConfigurer — @Bean 可以全面接管SpringMVC,所有规则全部自己重新配置;
实现定制和扩展功能(高级功能,初学者退避三舍 )。
@EnableWebMvc其实就是把默认的都禁用了, 原本的自动装配, 静态资源, 视图解析器等等都需要自己去配置
原理:
WebMvcAutoConfiguration : 默认的SpringMVC的自动配置功能类,如静态资源、欢迎页、视图解析器等。
一旦使用 @EnableWebMvc ,会@Import(DelegatingWebMvcConfiguration.class)。
DelegatingWebMvcConfiguration
的作用,只保证SpringMVC最基本的使用
把所有系统中的WebMvcConfigurer拿过来,所有功能的定制都是这些WebMvcConfigurer合起来一起生效。
自动配置了一些非常底层的组件,如RequestMappingHandlerMapping,这些组件依赖的组件都是从容器中获取如。
public class DelegatingWebMvcConfiguration extends WebMvcConfigurationSupport。
WebMvcAutoConfiguration里面的配置要能生效必须 @ConditionalOnMissingBean(WebMvcConfigurationSupport.class)。
@EnableWebMvc 导致了WebMvcAutoConfiguration 没有生效。
原理分析套路
场景starter - >xxxxAutoConfiguration - >导入xxx组件 - >绑定xxxProperties -> 绑定配置文件项
默认情况下 , 我们不需要做任何修改, 只依靠修改配置文件, 就可以使用springboot