最近在给项目写后台管理系统, 使用的是人人开源的模板 , 然后结合代码生成器生成了基本的CRUD代码 ( 真的爽~)
不过主要的代码还是需要自己写的, 这里总结一下vue遇到的一些基本的问题以及一些简单的知识点
贴一个地址 人人开源 (renren.io)
一般情况下会把 vue 代码写到<script> 标签里面 , vue其实就是一个对象( 结合vue的生命周期理解 ) , 基本的结构如下
1
2
3
4
5
6
7
8
9
10
11
12
13
14
15
16
17
18
19
20
21
22
23
24
25
26
27
28
| <template>
<button @click="increment">Count is: {{ count }}</button>
</template>
<script>
export default {
data() {
return {
count: 0
}
},
methods: {
increment() {
this.count++
}
},
mounted() {
console.log(`The initial count is ${this.count}.`)
}
}
</script>
|
OSS服务端签名直传
这里传输图片的方式是前端向后端发送请求然后获取凭证直接向oss传输图片
这样做的好处就是可以减轻服务器的压力, 否则在高峰期传输图片很占用服务器资源
同时相较于吧代码都放到前端会更加安全
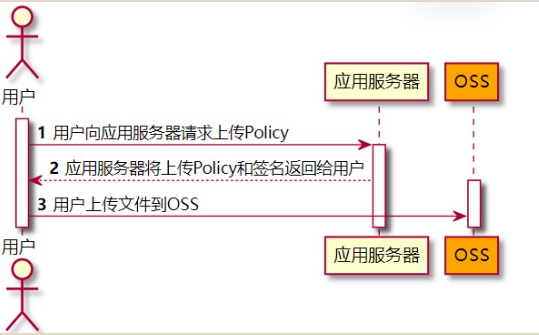
具体细节参考官方文档Java (aliyun.com) 服务端签名后直传 (aliyun.com)
- 配置服务器 java
- 配置客户端 Vue
- 在阿里云控制台设置跨域 CORS
- Demo测试
获取凭证接口
1
2
3
4
5
6
7
8
9
10
11
12
13
14
15
16
17
18
19
20
21
22
23
24
25
26
27
28
29
30
31
32
33
34
35
36
37
| @GetMapping("/oss/policy")
public R policy(HttpServletRequest request, HttpServletResponse response){
String host="https://"+bucket+"."+endpoint;
String callbackUrl = "https://192.168.0.0:8888";
String prefix = new SimpleDateFormat("yyyy-MM-dd").format(new Date());
String dir = prefix+"/";
Map<String, String> respMap=null;
try {
long expireTime = 30;
long expireEndTime = System.currentTimeMillis() + expireTime * 1000;
Date expiration = new Date(expireEndTime);
PolicyConditions policyConds = new PolicyConditions();
policyConds.addConditionItem(PolicyConditions.COND_CONTENT_LENGTH_RANGE, 0, 1048576000);
policyConds.addConditionItem(MatchMode.StartWith, PolicyConditions.COND_KEY, dir);
String postPolicy = ossClient.generatePostPolicy(expiration, policyConds);
byte[] binaryData = postPolicy.getBytes("utf-8");
String encodedPolicy = BinaryUtil.toBase64String(binaryData);
String postSignature = ossClient.calculatePostSignature(postPolicy);
respMap = new LinkedHashMap<String, String>();
respMap.put("ossaccessKeyId", accessId);
respMap.put("policy", encodedPolicy);
respMap.put("signature", postSignature);
respMap.put("dir", dir);
respMap.put("host", host);
respMap.put("expire", String.valueOf(expireEndTime / 1000));
} catch (Exception e) {
System.out.println(e.getMessage());
}
return R.ok().put("data",respMap);
}
|
前端上传
注意一定要改掉 自action="http://20230112-gulimall.oss-cn-shanghai.aliyuncs.com" 换成自己的OSS host
1
2
3
4
5
6
7
8
9
10
11
12
13
14
15
16
17
18
19
20
21
22
23
24
25
26
27
28
29
30
31
32
33
34
35
36
37
38
39
40
41
42
43
44
45
46
47
48
49
50
51
52
53
54
55
56
57
58
59
60
61
62
63
64
65
66
67
68
69
70
71
72
73
74
75
76
77
78
79
80
81
82
83
84
85
86
87
88
89
90
91
92
93
94
95
96
97
98
99
100
101
| <template>
<div>
<el-upload action="http://20230112-gulimall.oss-cn-shanghai.aliyuncs.com" :data="dataObj" list-type="picture"
:multiple="false" :show-file-list="showFileList" :file-list="fileList" :before-upload="beforeUpload"
:on-remove="handleRemove" :on-success="handleUploadSuccess" :on-preview="handlePreview">
<el-button size="small" type="primary">点击上传</el-button>
<div slot="tip" class="el-upload__tip">只能上传jpg/png文件,且不超过10MB</div>
</el-upload>
<el-dialog :visible.sync="dialogVisible">
<img width="100%" :src="fileList[0].url" alt="">
</el-dialog>
</div>
</template>
<script>
import { policy } from './policy'
import { getUUID } from '@/utils'
export default {
name: 'singleUpload',
props: {
value: String
},
computed: {
imageUrl() {
return this.value;
},
imageName() {
if (this.value != null && this.value !== '') {
return this.value.substr(this.value.lastIndexOf("/") + 1);
} else {
return null;
}
},
fileList() {
return [{
name: this.imageName,
url: this.imageUrl
}]
},
showFileList: {
get: function () {
return this.value !== null && this.value !== '' && this.value !== undefined;
},
set: function (newValue) {
}
}
},
data() {
return {
dataObj: {
policy: '',
signature: '',
key: '',
ossaccessKeyId: '',
dir: '',
host: '',
},
dialogVisible: false
};
},
methods: {
emitInput(val) {
this.$emit('input', val)
},
handleRemove(file, fileList) {
this.emitInput('');
},
handlePreview(file) {
this.dialogVisible = true;
},
beforeUpload(file) {
let _self = this;
return new Promise((resolve, reject) => {
policy().then(response => {
console.log("响应的数据", response);
_self.dataObj.policy = response.data.policy;
_self.dataObj.signature = response.data.signature;
_self.dataObj.ossaccessKeyId = response.data.ossaccessKeyId;
_self.dataObj.key = response.data.dir + getUUID() + '_${filename}';
_self.dataObj.dir = response.data.dir;
_self.dataObj.host = response.data.host;
console.log("响应的数据222。。。", _self.dataObj);
resolve(true)
}).catch(err => {
reject(false)
})
})
},
handleUploadSuccess(res, file) {
console.log("上传成功...")
this.showFileList = true;
this.fileList.pop();
this.fileList.push({ name: file.name, url: this.dataObj.host + '/' + this.dataObj.key.replace("${filename}", file.name) });
this.emitInput(this.fileList[0].url);
}
}
}
</script>
<style>
</style>
|
OSS上传视频
这里的场景就是需要在后台保存一个课程, 包括基本的信息, 以及视频id , 封面地址等信息
表结构如下
1
2
3
4
5
6
7
8
9
10
11
12
13
14
15
16
17
18
19
20
21
22
23
| SET NAMES utf8mb4;
SET FOREIGN_KEY_CHECKS = 0;
DROP TABLE IF EXISTS `t_course`;
CREATE TABLE `t_course` (
`id` bigint(20) NOT NULL AUTO_INCREMENT COMMENT '主键',
`course_name` varchar(512) CHARACTER SET utf8mb4 COLLATE utf8mb4_general_ci NOT NULL COMMENT '锻炼动作名称',
`course_description` varchar(1024) CHARACTER SET utf8mb4 COLLATE utf8mb4_general_ci NOT NULL COMMENT '动作讲解',
`cover_image` varchar(1024) CHARACTER SET utf8mb4 COLLATE utf8mb4_general_ci NOT NULL COMMENT '封面图片的id',
`course_video` varchar(2048) CHARACTER SET utf8mb4 COLLATE utf8mb4_general_ci NOT NULL COMMENT '动作讲解视频 : t_video',
`tags` varchar(255) CHARACTER SET utf8mb4 COLLATE utf8mb4_general_ci NULL DEFAULT NULL COMMENT '疾病标签',
`count_method` tinyint(4) NOT NULL DEFAULT 1 COMMENT '统计方式 : 1: 个数 2: 时间',
`create_time` timestamp NOT NULL DEFAULT CURRENT_TIMESTAMP COMMENT '创建时间',
`update_time` timestamp NOT NULL DEFAULT CURRENT_TIMESTAMP COMMENT '更新时间',
`is_delete` tinyint(4) NOT NULL DEFAULT 0 COMMENT '逻辑删除',
PRIMARY KEY (`id`) USING BTREE
) ENGINE = InnoDB AUTO_INCREMENT = 1621513893992509442 CHARACTER SET = utf8mb4 COLLATE = utf8mb4_general_ci ROW_FORMAT = Dynamic;
SET FOREIGN_KEY_CHECKS = 1;
|
注意点 ⭐
- 上传视频的时候一定要注意前端的host与后端的endpoint是保持一致的 , 不然可能会出现上传的bucket 以及我们存储的地址用的不是一个bucket
- java引入阿里云的依赖踩了很多坑 , 建议直接手动
@Bean 注入, 然后相关的信息写到配置文件里面 , 不适用自动注入
- 阿里云前端上传的时候有可能需要设置跨域 , 需要注意如果前端控制台在上传图片的时候出现了类似
allow-origin 的信息, 最好去OSS控制台看一下是否是bucket 没有设置允许跨域
后端upload准备
后端引入SDK
1
2
3
4
5
6
7
8
9
10
11
12
13
14
15
16
17
18
19
20
21
22
23
24
25
26
27
28
29
30
31
| <dependency>
<groupId>com.aliyun</groupId>
<artifactId>aliyun-java-sdk-core</artifactId>
<version>4.6.0</version>
</dependency>
<dependency>
<groupId>com.aliyun</groupId>
<artifactId>aliyun-java-sdk-vod</artifactId>
<version>2.16.10</version>
</dependency>
<dependency>
<groupId>com.aliyun</groupId>
<artifactId>aliyun-java-sdk-kms</artifactId>
<version>2.10.1</version>
</dependency>
<dependency>
<groupId>io.undertow</groupId>
<artifactId>undertow-servlet</artifactId>
<version>2.3.2.Final</version>
</dependency>
<dependency>
<groupId>com.aliyun</groupId>
<artifactId>vod20170321</artifactId>
<version>2.16.12</version>
</dependency>
<dependency>
<groupId>com.google.code.gson</groupId>
<artifactId>gson</artifactId>
<version>2.9.1</version>
</dependency>
|
配置信息
1
2
3
4
5
6
7
8
| spring:
alicloud:
oss:
endpoint: oss-cn-shanghai.aliyuncs.com
bucket: 2*************
regionId: cn-shanghai
access-key: *************
secret-key: *************
|
手动配置OSSClient
1
2
3
4
5
6
7
8
9
10
11
12
13
14
15
16
17
18
19
20
21
22
23
24
| @Configuration
public class OSSConfig {
@Value("${spring.cloud.alicloud.oss.endpoint}")
private String endpoint;
@Value("${spring.cloud.alicloud.access-key}")
String accessId;
@Value("${spring.cloud.alicloud.secret-key}")
String accessKey;
@Value("${spring.cloud.alicloud.oss.regionId}")
String regionId;
@Bean
public OSSClient ossClient() {
return new OSSClient(endpoint, accessId, accessKey);
}
@Bean
public DefaultAcsClient vodClient(){
DefaultProfile profile = DefaultProfile.getProfile(regionId, accessId, accessKey);
DefaultAcsClient client = new DefaultAcsClient(profile);
return client;
}
}
|
service层代码
这里先写了个工具类吧MltipartFile 转换成File类型了
FileUtil
1
2
3
4
5
6
7
8
9
10
11
12
13
14
15
16
17
18
|
public static File multipartFileToFile(MultipartFile file) throws Exception {
File toFile = null;
if (file.equals("") || file.getSize() <= 0) {
file = null;
} else {
InputStream ins = null;
ins = file.getInputStream();
toFile = new File(file.getOriginalFilename());
inputStreamToFile(ins, toFile);
ins.close();
}
return toFile;
}
|
核心代码
注意这里的bucketName 与我们oss 的Bucket 不是一个东西
1
2
3
4
5
6
7
8
9
10
11
12
13
14
15
16
17
18
19
20
21
22
23
| @Override
public R uploadVideo(File file) {
String videoId = "";
try {
CreateUploadVideoResponse createUploadVideoResponse = createUploadVideo(vodClient);
videoId = createUploadVideoResponse.getVideoId();
JSONObject uploadAuth = JSONObject.parseObject(decodeBase64(createUploadVideoResponse.getUploadAuth()));
JSONObject uploadAddress = JSONObject.parseObject(decodeBase64(createUploadVideoResponse.getUploadAddress()));
OSSClient ossClient = initOssClient(uploadAuth, uploadAddress);
String bucketName = uploadAddress.getString("Bucket");
String objectName = uploadAddress.getString("FileName");
PutObjectResult result = ossClient.putObject(bucketName, objectName, file);
log.info("[OSS]Put local file succeed, VideoId : {}",videoId);
} catch (Exception e) {
log.error("[OSS]Put local file fail, ErrorMessage : " + e.getLocalizedMessage());
}
return R.ok().put("videoId",videoId);
}
|
前端代码
前端这里使用的是element-ui的组件
使用element-ui的upload组件
基本的属性信息如下
| 参数 |
说明 |
类型 |
可选值 |
默认值 |
| action |
必选参数,上传的地址 |
string |
— |
— |
| headers |
设置上传的请求头部 |
object |
— |
— |
| multiple |
是否支持多选文件 |
boolean |
— |
— |
| data |
上传时附带的额外参数 |
object |
— |
— |
| name |
上传的文件字段名 |
string |
— |
file |
| with-credentials |
支持发送 cookie 凭证信息 |
boolean |
— |
false |
| show-file-list |
是否显示已上传文件列表 |
boolean |
— |
true |
| drag |
是否启用拖拽上传 |
boolean |
— |
false |
| accept |
接受上传的文件类型(thumbnail-mode 模式下此参数无效) |
string |
— |
— |
| on-preview |
点击文件列表中已上传的文件时的钩子 |
function(file) |
— |
— |
| on-remove |
文件列表移除文件时的钩子 |
function(file, fileList) |
— |
— |
| on-success |
文件上传成功时的钩子 |
function(response, file, fileList) |
— |
— |
| on-error |
文件上传失败时的钩子 |
function(err, file, fileList) |
— |
— |
| on-progress |
文件上传时的钩子 |
function(event, file, fileList) |
— |
— |
| on-change |
文件状态改变时的钩子,添加文件、上传成功和上传失败时都会被调用 |
function(file, fileList) |
— |
— |
| before-upload |
上传文件之前的钩子,参数为上传的文件,若返回 false 或者返回 Promise 且被 reject,则停止上传。 |
function(file) |
— |
— |
| before-remove |
删除文件之前的钩子,参数为上传的文件和文件列表,若返回 false 或者返回 Promise 且被 reject,则停止删除。 |
function(file, fileList) |
— |
— |
| list-type |
文件列表的类型 |
string |
text/picture/picture-card |
text |
| auto-upload |
是否在选取文件后立即进行上传 |
boolean |
— |
true |
| file-list |
上传的文件列表, 例如: [{name: ‘food.jpg’, url: ‘https://xxx.cdn.com/xxx.jpg’}] |
array |
— |
[] |
| http-request |
覆盖默认的上传行为,可以自定义上传的实现 |
function |
— |
— |
| disabled |
是否禁用 |
boolean |
— |
false |
| limit |
最大允许上传个数 |
number |
— |
— |
| on-exceed |
文件超出个数限制时的钩子 |
function(files, fileList) |
— |
|
1
2
3
4
5
6
7
8
9
10
11
12
| <el-form-item label="视频讲解" prop="courseVideo">
<!-- :="dataForm.courseVideo" -->
<el-upload style="margin-left:14%;margin-top:5%" class="avatar-uploader el-upload--text" :action="uploadUrl"
:drag="Plus" :show-file-list="true" enctype="multipart/form-data" :on-success="handleVideoSuccess"
:before-upload="beforeUploadVideo" :on-progress="uploadVideoProcess">
<i v-if="Plus" class="el-icon-upload"></i>
<div v-if="Plus" class="el-upload__text">将文件拖到此处,或<em>点击上传</em></div>
<el-progress v-if="videoFlag == true" type="circle" :percentage="videoUploadPercent"
style="margin-top:30px;"></el-progress>
<div class="el-upload__tip" slot="tip">只能上传mp4/flv/avi文件, 且不超过200M</div>
</el-upload>
</el-form-item>
|
准备uploadVideo组件
1
2
3
4
5
6
7
8
9
10
11
12
13
14
15
16
17
18
19
20
21
22
23
24
25
26
27
28
29
30
31
32
33
34
35
36
37
38
39
40
41
42
43
44
45
46
47
48
49
50
51
52
53
54
55
56
57
58
59
60
61
62
63
64
65
66
67
68
69
70
71
72
73
74
75
76
77
78
79
80
81
82
83
84
85
86
| <template>
<div class="test2">
<el-upload style="margin-left:14%;margin-top:5%" class="avatar-uploader el-upload--text" :drag="Plus"
:action="url" :show-file-list="true" enctype="multipart/form-data" :headers="header"
:data="{ SavePath: this.Path.url }" :on-success="handleVideoSuccess" :before-upload="beforeUploadVideo"
:on-progress="uploadVideoProcess">
<i v-if="Plus" class="el-icon-upload"></i>
<div v-if="Plus" class="el-upload__text">将文件拖到此处,或<em>点击上传</em></div>
<el-progress v-if="videoFlag == true" type="circle" :percentage="videoUploadPercent"
style="margin-top:30px;"></el-progress>
<div class="el-upload__tip" slot="tip">只能上传mp4/flv/avi文件,且不超过200M</div>
</el-upload>
</div>
</template>
<script>
export default {
name: 'test2',
data() {
return {
url: 'http://localhost:88/api/thirdparty/oss/upload/video',
videoForm: {
videoId: '',
videoUrl: ''
},
videoFlag: false,
Plus: true,
Path: {
url: 'F:/video/videoUpload'
},
videoUploadPercent: 0
}
},
mounted: function () {
},
methods: {
beforeUploadVideo(file) {
console.log(file);
let name = file.name;
var index = name.lastIndexOf(".");
var type = name.substring(index + 1, name.length)
console.log("文件的类型为: " + name.substring(index + 1, name.length));
const isLt300M = file.size / 1024 / 1024 < 300;
if (['mp4', 'ogg', 'flv', 'avi', 'wmv', 'rmvb'].indexOf(type) === -1) {
this.$message.error('请上传正确的视频格式')
return false
}
if (!isLt300M) {
this.$message.error('上传视频大小不能超过300MB哦!')
return false
}
},
handlePreview(file) {
console.log(file);
},
uploadVideoProcess(event, file, fileList) {
this.Plus = false
this.videoFlag = true
this.videoUploadPercent = parseFloat(file.percentage.toFixed(0))
},
handleVideoSuccess(res, file) {
this.Plus = false
this.videoUploadPercent = 100
console.log(res)
if (res.code == 200) {
this.videoForm.videoId = res.newVidoeName
this.videoForm.videoUrl = res.VideoUrl
this.$message.success('视频上传成功!')
} else {
this.$message.error('视频上传失败,请重新上传!')
}
}
}
}
</script>
|
引入组件
注意需要在视频上传成功之后处理相应的结果 , 这里需要做的就是 吧返回的视频id 绑定到courseVideo
-
l另外需要注意的是出需要绑定 action 也就是上传的地址, 如果是直接上传到 oss , 那么一般是oss的host , 如果不是那么就需要配置相应的后端的地址uploadUrl: 'http://localhost:88/api/thirdparty/oss/upload/video',
这里可以使用 vue 来进行动态绑定
1
2
3
4
5
6
7
8
9
10
11
12
| <el-form-item label="视频讲解" prop="courseVideo">
<!-- :="dataForm.courseVideo" -->
<el-upload style="margin-left:14%;margin-top:5%" class="avatar-uploader el-upload--text" :action="uploadUrl"
:drag="Plus" :show-file-list="true" enctype="multipart/form-data" :on-success="handleVideoSuccess"
:before-upload="beforeUploadVideo" :on-progress="uploadVideoProcess">
<i v-if="Plus" class="el-icon-upload"></i>
<div v-if="Plus" class="el-upload__text">将文件拖到此处,或<em>点击上传</em></div>
<el-progress v-if="videoFlag == true" type="circle" :percentage="videoUploadPercent"
style="margin-top:30px;"></el-progress>
<div class="el-upload__tip" slot="tip">只能上传mp4/flv/avi文件, 且不超过200M</div>
</el-upload>
</el-form-item>
|
处理结果数据
1
2
3
4
5
6
7
8
9
10
11
12
13
14
15
|
handleVideoSuccess(res, file) {
this.Plus = false
this.videoUploadPercent = 100
console.log(res)
if (res.code == 200) {
this.dataForm.courseVideo = res.videoId;
this.$message.success('视频上传成功!')
} else {
this.$message.error('视频上传失败,请重新上传!')
}
},
|
更新阿里云控制台视频信息
这一步需要做的就是在 设置完 课程的信息之后, 把课程的信息 设置到阿里云的 控制台中, 方便以后进行管理
vue代码
在表单提交的时候去 向后端发请求, 更新视频的数据
1
2
3
4
5
6
7
8
9
10
11
12
13
14
15
16
17
18
19
20
21
22
23
24
25
26
27
28
29
30
31
32
33
34
35
36
37
38
39
40
41
42
43
44
45
46
47
48
49
50
| dataFormSubmit() {
this.$refs['dataForm'].validate((valid) => {
if (valid) {
console.log("表单提交: " + this.dataForm)
this.$http({
url: this.$http.adornUrl(`/exercise/course/${!this.dataForm.id ? 'save' : 'update'}`),
method: 'post',
data: this.$http.adornData({
'id': this.dataForm.id || undefined,
'courseName': this.dataForm.courseName,
'courseDescription': this.dataForm.courseDescription,
'coverImage': this.dataForm.coverImage,
'courseVideo': this.dataForm.courseVideo,
'countMethod': this.dataForm.countMethod,
'tags': this.dataForm.tags,
'createTime': this.dataForm.createTime,
'updateTime': this.dataForm.updateTime,
'isDelete': this.dataForm.isDelete
})
}).then(({ data }) => {
if (data && data.code === 200) {
console.log("更新阿里云控制台中的视频信息")
this.$http({
url: this.$http.adornUrl(`/thirdparty/oss/update/videoinfo`),
method: 'post',
data: this.$http.adornData({
'courseVideo': this.dataForm.courseVideo,
'courseName': this.dataForm.courseName,
'courseDescription': this.dataForm.courseDescription,
'coverImage': this.dataForm.coverImage,
})
}).then(({ data }) => {
console.log(data.code == 200 ? "更新控制台视频信息成功" : "更新控制台视频信息失败");
})
this.$message({
message: '操作成功',
type: 'success',
duration: 1500,
onClose: () => {
this.visible = false
this.$emit('refreshDataList')
}
})
} else {
this.$message.error(data.msg)
}
})
}
})
}
|
java代码
封装vo
1
2
3
4
5
6
7
| @Data
public class UpdateVideoInfoVo {
private String courseVideo;
private String courseName;
private String courseDescription;
private String coverImage;
}
|
配置client
需要注意的是, 这里的endpoint 与我们配置OSSClient 需要的endpoint不一样 , 需要在前面加上vod 前缀, 这里直接就写在代码里面了
1
2
3
4
5
6
7
8
9
10
11
12
13
14
15
16
17
18
19
20
21
22
23
24
25
26
27
28
| @Configuration
public class OSSConfig {
@Value("${spring.cloud.alicloud.oss.endpoint}")
private String endpoint;
@Value("${spring.cloud.alicloud.access-key}")
String accessId;
@Value("${spring.cloud.alicloud.secret-key}")
String accessKey;
@Value("${spring.cloud.alicloud.oss.regionId}")
String regionId;
@Bean
public com.aliyun.vod20170321.Client updateVideoInfoClient() throws Exception {
com.aliyun.teaopenapi.models.Config config = new com.aliyun.teaopenapi.models.Config()
.setAccessKeyId(accessId)
.setAccessKeySecret(accessKey);
config.endpoint = "vod.cn-shanghai.aliyuncs.com";
return new com.aliyun.vod20170321.Client(config);
}
}
|
service层代码
1
2
3
4
5
6
7
8
9
10
11
12
13
14
15
16
17
18
19
20
21
22
23
24
25
26
27
28
29
| @Override
public R updateVideoInfo(UpdateVideoInfoVo videoInfoVo) {
String videoId = videoInfoVo.getCourseVideo();
String courseName = videoInfoVo.getCourseName();
String courseDescription = videoInfoVo.getCourseDescription();
String coverImage = videoInfoVo.getCoverImage();
com.aliyun.vod20170321.models.UpdateVideoInfoRequest updateVideoInfoRequest = new com.aliyun.vod20170321.models.UpdateVideoInfoRequest()
.setVideoId(videoId)
.setTitle(courseName)
.setDescription(courseDescription)
.setCoverURL(coverImage);
com.aliyun.teautil.models.RuntimeOptions runtime = new com.aliyun.teautil.models.RuntimeOptions();
try {
updateVideoInfoClient.updateVideoInfoWithOptions(updateVideoInfoRequest, runtime);
} catch (TeaException error) {
log.error("[0ss] 更新oss控制台视频信息失败");
com.aliyun.teautil.Common.assertAsString(error.message);
return R.error(ErrorCode.SYSTEM_ERROR);
} catch (Exception _error) {
TeaException error = new TeaException(_error.getMessage(), _error);
log.error("[0ss] 更新oss控制台视频信息失败");
com.aliyun.teautil.Common.assertAsString(error.message);
return R.error(ErrorCode.SYSTEM_ERROR);
}
return R.ok();
}
|
element-ui表格
日期格式
(31条消息) elementui 之el-table-column 日期格式显示_在奋斗的大道的博客-CSDN博客_elementui表格怎么展示日期
1
2
| <el-table-column prop="addTime" label="添加时间" :formatter="formatDate" >
</el-table-column>
|
method
1
2
3
4
5
6
7
8
9
10
|
formatDate(row, column) {
let data = row[column.property]
if(data == null) {
return null
}
let dt = new Date(data)
return dt.getFullYear() + '-' + (dt.getMonth() + 1) + '-' + dt.getDate() + ' ' + dt.getHours() + ':' + dt.getMinutes() + ':' + dt.getSeconds()
},
|
性别
1
2
| <el-table-column prop="gender" header-align="center" align="center" label="性别" :formatter="sfktFormate">
</el-table-column>
|
method
1
2
3
4
5
6
7
8
| sfktFormate(row, index) {
if (row.type == 1) {
return "男";
} else if (row.type == 0) {
imp
return "女";
}
},
|
隐藏多余文字
1
2
3
| <el-table-column prop="courseDescription" header-align="center" align="center" label="动作讲解" width="280"
show-overflow-tooltip="true">
</el-table-column>
|
设置show-overflow-tooltip="true" 即可
设置表格宽度
比如width="60"
后端引入阿里云OSS依赖踩坑🤕
直接引入spring-cloud-starter-alicloud-oss
1
2
3
4
5
| <dependency>
<groupId>com.alibaba.cloud</groupId>
<artifactId>spring-cloud-starter-alicloud-oss</artifactId>
<version>2.2.0.RELEASE</version>
</dependency>
|
直接引入cloud-starter 的问题就是会出现依赖冲突 ,
Parameter 0 of method inetIPv6Util in com.alibaba.cloud.nacos.utils.UtilIPv6AutoConfiguration required a single bean, but 2 were found
Parameter 0 of method inetIPv6Util in com.alibaba.cloud.nacos.utils.UtilIPv6AutoConfiguration required a single bean, but 2 were found: · Issue #2789 · alibaba/spring-cloud-alibaba (github.com)
这个问题在网上搜了很久只在github上面找到了一个解释 , 下面给出的解决办法是把这个依赖换成
aliyun-sdk-oss
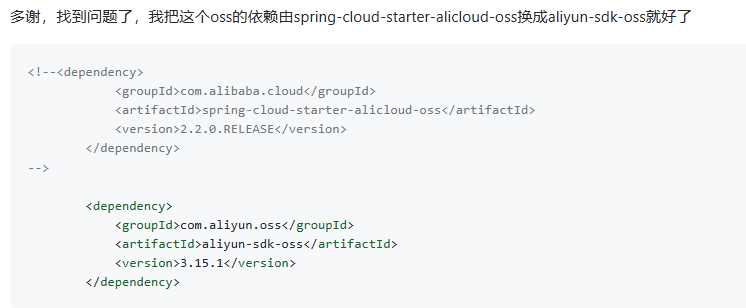
但是我换成依赖换成这个又报错 , 明明依赖里面有Oss , 但是在配置文件中idea根本无法识别配置
1
2
3
4
5
6
7
8
| spring:
cloud:
alicloud:
access-key: L####5tSW########
secret-key: C####giYEBu7#######
oss:
endpoint: o##########s.com
bucket:
|

项目启动报错:
1
2
3
4
5
6
7
8
9
10
11
12
| ***************************
APPLICATION FAILED TO START
***************************
Description:
A component required a bean of type 'com.aliyun.oss.OSS' that could not be found.
Action:
Consider defining a bean of type 'com.aliyun.oss.OSS' in your configuration.
|
解决方法1️⃣ ⭐
【Java面试】如何碾压面试官?@Resource 和@Autowired 的区别_哔哩哔哩_bilibili
原本这个问题坑了好久 , 昨天偶然又去看了看@Autowired 与@Resource的区别, 然后再理解项目启动报错给出的信息 , 大概能理解是为什么报错了
Parameter 0 of method inetIPv6Util in com.alibaba.cloud.nacos.utils.UtilIPv6AutoConfiguration required a single bean, but 2 were found
一般情况我们可能只会注意这两者一个是基于类型, 一个是基于名称去注入, 其实@Resource也是可以通过类型去进行Bean注入, 不过默认是使用基于名称去注入
spring不但支持自己定义的@Autowired注解,还支持几个由JSR-250规范定义的注解,它们分别是@Resource、@PostConstruct以及@PreDestroy。
@Autowired默认按类型装配(这个注解是属业spring的),默认情况下必须要求依赖对象必须存在,如果要允许null值,可以设置它的required属性为false,如:@Autowired(required=false) ,如果我们想使用名称装配可以结合@Qualifier注解进行使用
1
2
3
| @Autowired()
@Qualifier("baseDao")
privateBaseDao baseDao;
|
@Resource(这个注解属于J2EE的),默认按照名称进行装配,名称可以通过name属性进行指定,如果没有指定name属性,当注解写在字段上时,默认取字段名进行安装名称查找,如果注解写在setter方法上默认取属性名进行装配。当找不到与名称匹配的bean时才按照类型进行装配。但是需要注意的是,如果name属性一旦指定,就只会按照名称进行装配
@Autowired 与@Resource选择(治好你的强迫症) - 幂次方 - 博客园 (cnblogs.com)
需要注意的是@Autowired的required属性, 如果项目启动的时候容器中不存在 类型的Bean , 那么就会报错, 上面的启动报错也就是这个原因, 所以这里的两个解决办法就是
- 使用
@Autowired(required=false)
- 使用
@Resource
解决办法2️⃣
使用
aliyun-oss-spring-boot-starter
不过这个依赖里面的版本是旧版本, 因此配置信息的格式跟cloud-starter不一样
1
2
3
4
5
6
7
| alibaba:
cloud:
access-key: LTA########rfpVPBo68ayqw
secret-key: CeEgJtVgiYE#######mnvBB7K
oss:
endpoint: oss-cn########cs.com
bucket: 2
|
不过折腾了半天总算是项目启动成功了
最后启动成功的配置是
1
2
3
4
5
6
7
8
9
10
11
12
13
14
15
16
17
|
<dependency>
<artifactId>aliyun-oss-spring-boot-starter</artifactId>
<version>1.0.0</version>
<exclusions>
<exclusion>
<groupId>com.aliyun.oss</groupId>
<artifactId>aliyun-sdk-oss</artifactId>
</exclusion>
</exclusions>
</dependency>
<dependency>
<groupId>com.aliyun.oss</groupId>
<artifactId>aliyun-sdk-oss</artifactId>
<version>3.16.0</version>
</dependency>
|
OssClient自动注入
1
2
3
4
5
6
7
8
9
10
| ***************************
APPLICATION FAILED TO START
***************************
Description:
Field ossClient in com.dhx.gulimall.third_party.controller.OssController required a bean of type 'com.aliyun.oss.OSSClient' that could not be found.
The injection point has the following annotations:
- @org.springframework.beans.factory.annotation.Autowired(required=true)
|

这里可以直接看源码中的自动注入的配置
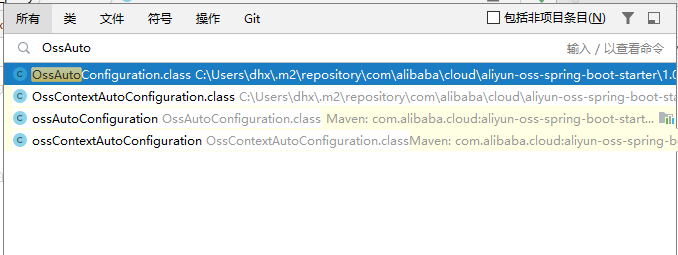
通过查看OssContextAutoConfiguration我们可以发现OssClient Bean的返回类型是OSS
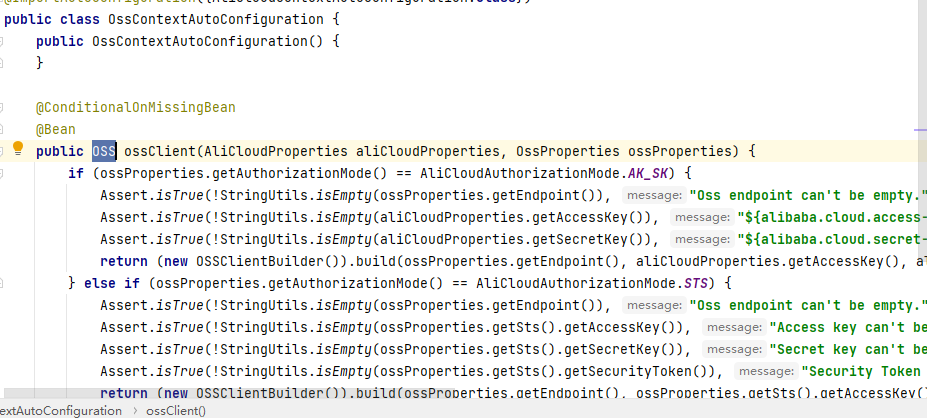
但是这个OSS是接口类型
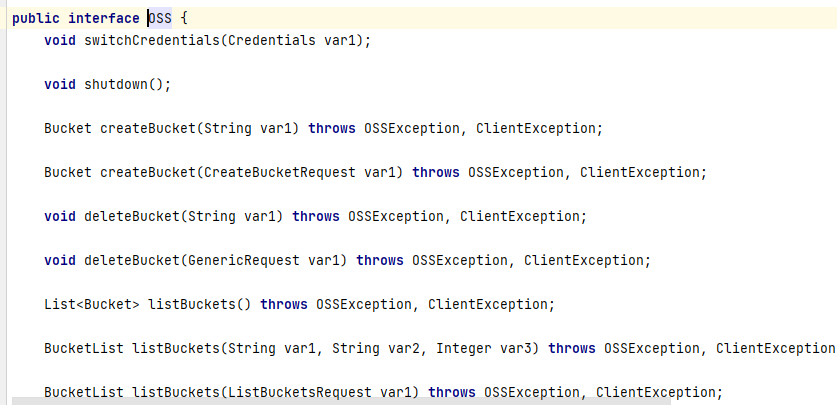
那么我们都知道@Autowired默认按类型装配 , 那么我们就需要把 注入的类型改成OSS
⭕另一个方法就是不适用@Authwired , 我们直接使用@Resource
1
2
| @Resource
OssClient ossClient;
|
手动注入OSSClient
加上@Configuration 注解 , 交给spring来进行管理, 更方便进行配置以及修改
1
2
3
4
5
6
7
8
9
10
11
12
13
14
15
16
17
18
19
20
21
22
23
24
25
26
27
28
29
30
31
32
33
34
35
36
37
38
39
40
41
42
43
44
45
46
47
48
49
50
51
52
53
54
55
| package com.dhx.smart_medicine.thirdparty.config;
import com.aliyun.oss.OSSClient;
import com.aliyuncs.DefaultAcsClient;
import com.aliyuncs.profile.DefaultProfile;
import org.springframework.beans.factory.annotation.Value;
import org.springframework.context.annotation.Bean;
import org.springframework.context.annotation.Configuration;
@Configuration
public class OSSConfig {
@Value("${spring.cloud.alicloud.oss.endpoint}")
private String endpoint;
@Value("${spring.cloud.alicloud.access-key}")
String accessId;
@Value("${spring.cloud.alicloud.secret-key}")
String accessKey;
@Value("${spring.cloud.alicloud.oss.regionId}")
String regionId;
@Bean
public OSSClient ossClient() {
return new OSSClient(endpoint, accessId, accessKey);
}
@Bean
public DefaultAcsClient vodClient(){
DefaultProfile profile = DefaultProfile.getProfile(regionId, accessId, accessKey);
DefaultAcsClient client = new DefaultAcsClient(profile);
return client;
}
@Bean
public com.aliyun.vod20170321.Client updateVideoInfoClient() throws Exception {
com.aliyun.teaopenapi.models.Config config = new com.aliyun.teaopenapi.models.Config()
.setAccessKeyId(accessId)
.setAccessKeySecret(accessKey);
config.endpoint = "vod.cn-shanghai.aliyuncs.com";
return new com.aliyun.vod20170321.Client(config);
}
}
|


