根据黑马程序员Netty教程
IO与NIO
Java NIO(New IO)是从Java 1.4版本开始引入的一个新的IO API,可以用于替代标准的Java IO API 。
NIO与原来的IO有同样的作用和目的,但是使用的方式完全不同,NIO支持面向缓冲区的、基于通道的IO操作 。
NIO
IO
面向流(Stream Oriented)
面向缓冲区(Buffer Oriented)
阻塞IO(Blocking IO)
非阻塞IO(Non Blocking IO)
选择器(Selectors
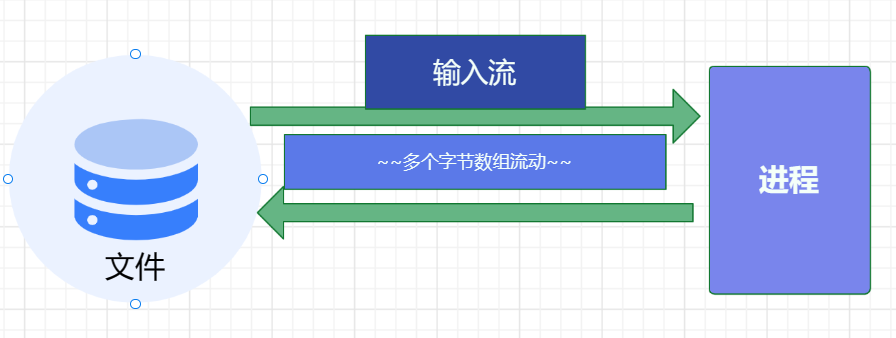
对于传统的IO流,如果我们想要把磁盘文件或者网络文件中的数据读取到程序中,需要建立一个用于传输数据的管道 ,
原来我们传输数据面对的直接就是管道里面一个个字节数据 的流动(例如我们弄了一个 byte 数组,来回进行数据传递),
传统的 IO 它面对的就是管道里面的一个数据流动,因此我们说传统的的 IO 是面向流的。
IO流还有一个特点就是,它是单向 的。
如果我们想把目标地点的数据读取到程序中来,我们需要建立一个管道,这个管道我们称为输入流 。
如果我们想把程序中的数据想要写到目标地点去,我们也要再建立一个管道,这个管道我们称为输出流 。
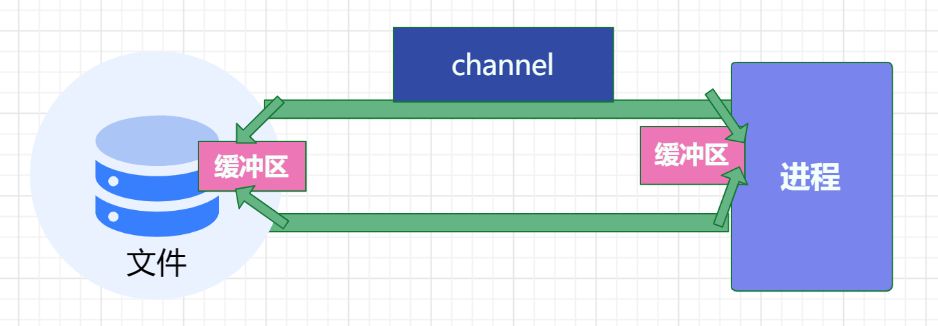
那么对于NIO (Non Blocking IO)
NIO的设计还是为了数据传输。对于channel ,如果说之前的文件流类似于水流,那么channel就类似于铁路 。对于铁路本身,他是不能直接传输数据的 ,需要我们配备上火车车厢 ,而channel的作用就是连接初始地点以及目标地点。因此注意通道本身不能传输数据,要想传输数据必须要有缓冲区 。如果你想要把数据写入到文件中,那么就可以先把部分的数据写入到缓冲区中, 通过通道把这部分数据运输到目标的文件,反之亦然。因此说现在的面向缓冲区的传输方式是双向的。
通过下面的代码示例,可以帮助你更好的理解两者的区别。
使用IO流
1
2
3
4
5
6
7
8
9
10
11
12
13
14
15
16
static String fileName = "test.txt" ;static String resultFileName = "result.txt" ;static void readFile () { try ( FileInputStream fis = new FileInputStream (fileName); FileOutputStream fos = new FileOutputStream (resultFileName);){ byte []buffer=new byte [24 ]; int read=-1 ; while ((read=fis.read(buffer))!=-1 ){ String s = new String (buffer); fos.write(s.substring(0 ,read).getBytes()); System.out.print(s.substring(0 ,read)); } }catch (Exception e){ log.error(e.getMessage()); } }
我们通过FileInputStream 读取文件中的数据 , 然后通过FileOutputStream 来将结果写入另一个文件 , 其中的buffer用来缓存读入的数据。
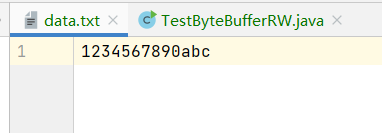
示例文件如下
运行程序 (IDEA ctrl + shift + F10 )
那么接着来看使用通道的例子
1
2
3
4
5
6
7
8
9
10
11
12
13
14
15
static void channelDemo () { try (RandomAccessFile file = new RandomAccessFile (fileName, "r" ); FileChannel channel = file.getChannel(); FileOutputStream os = new FileOutputStream (resultFileName)) { ByteBuffer buffer = ByteBuffer.allocate(24 ); int bytesRead; while ((bytesRead = channel.read(buffer)) != -1 ) { buffer.flip(); os.write(buffer.array(), 0 , bytesRead); buffer.clear(); } } catch (IOException e) { log.error(e.getMessage()); } }
这里需要注意的是,虽然通道是双向的,但是在实际使用中,我们通常需要将数据从一个位置复制到另一个位置。这就需要同时使用两个通道,一个用于读取数据,另一个用于写入数据。
NIO三大组件
Java NIO系统的核心 在于:通道(Channel)和缓冲区(Buffer) 。
通道表示打开到 IO 设备(例如:文件、套接字)的连接 。
若需要使用 NIO 系统,需要获取用于连接 IO 设备的通道 以及用于容纳数据的缓冲区 。然后操作缓冲区,对数据进行处理
简而言之,通道负责传输,缓冲区负责存储
常见的Channel有以下四种 ,其中FileChannel 主要用于文件传输 ,其余三种用于网络通信
FileChannel
DatagramChannel
SocketChannel
ServerSocketChannel
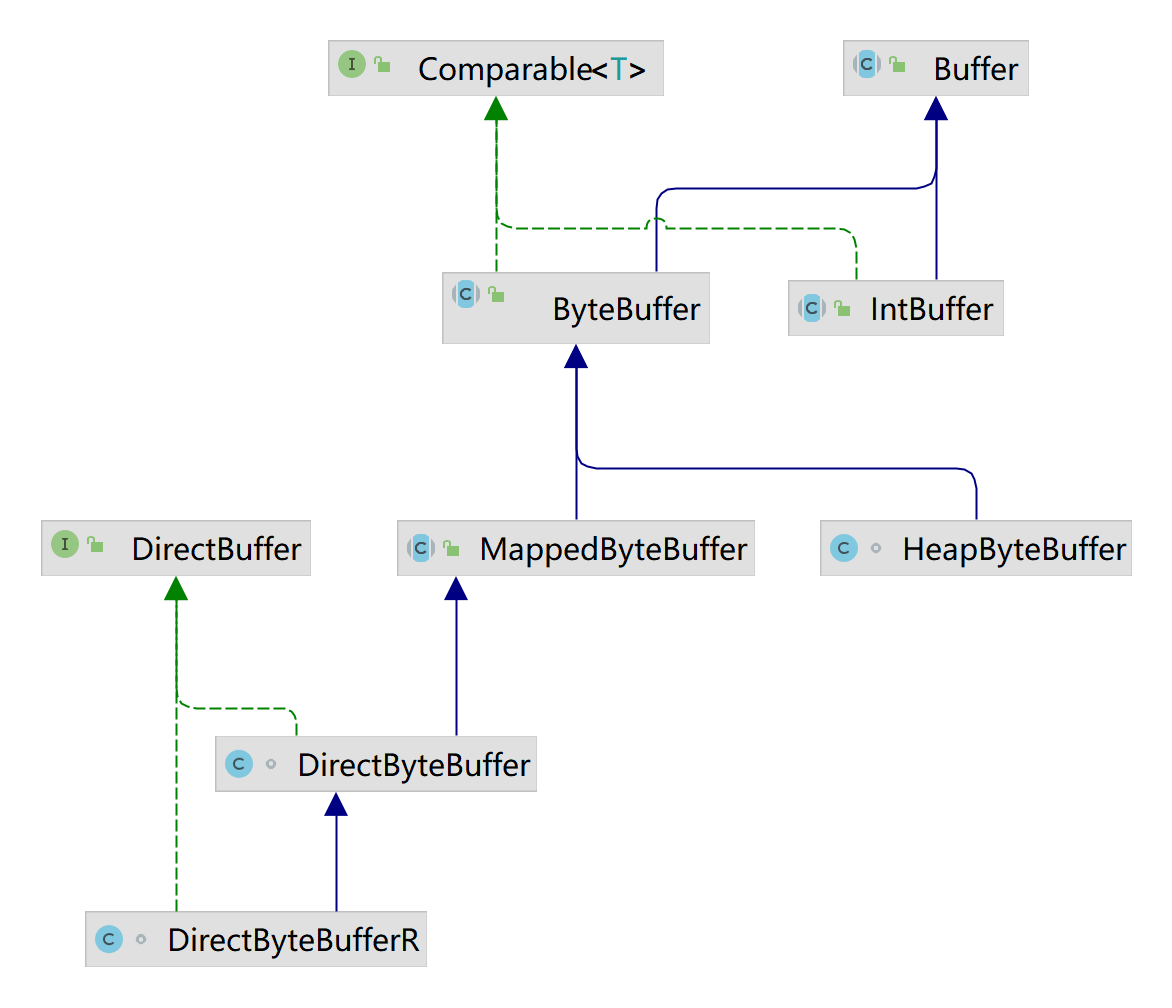
Buffer有以下几种 ,其中使用较多的是ByteBuffer
ByteBuffer
MappedByteBuffer
DirectByteBuffer
HeapByteBuffer
ShortBuffer
IntBuffer
LongBuffer
FloatBuffer
DoubleBuffer
CharBuffer
下图中只显示类IntBuffer , 实际上几个基础类型为基础的Buffer都是类似的,可以自己参考java.nio包下的源码。
1.2 Selector
selector 单从字面意思不好理解,需要结合服务器的设计演化 来理解它的用途
selector
n.(运动队队员的)选拔人;选择器;转换器;换挡器
多线程版设计
1
2
3
4
5
6
graph TD subgraph 普通多线程 t1(thread) --> s1(socket1) t2(thread) --> s2(socket2) t3(thread) --> s3(socket3) end
这种方法存在以下几个问题
内存占用高
每个线程都需要占用一定的内存,当连接较多时,会开辟大量线程,导致占用大量内存
线程上下文切换成本高 只适合连接数少的场景
线程池版设计
1
2
3
4
5
6
7
graph TD subgraph 使用线程池 t4(thread) --> s4(socket1) t5(thread) --> s5(socket2) t4(thread) -.-> s6(socket3) t5(thread) -.-> s7(socket4) end
这种方法存在以下几个问题
阻塞模式 下,线程仅能处理一个连接
仅适合
短连接
场景
短连接即建立连接发送请求并响应后就立即断开,使得线程池中的线程可以快速处理其他连接
selector 版设计
selector 的作用就是配合一个线程来管理多个 channel,获取这些 channel 上发生的事件,这些 channel 工作在非阻塞模式下,不会让线程吊死在一个 channel 上。适合连接数特别多,但流量低的场景(low traffic)
1
2
3
4
5
6
7
graph TD subgraph 使用selector thread --> selector selector --> c1(channel) selector --> c2(channel) selector --> c3(channel) end
调用 selector 的 select() 会阻塞直到 channel 发生了读写就绪事件,这些事件发生,select 方法就会返回这些事件交给 thread 来处理
ByteBuffer
基本使用
获取channel : 通过文件流获取
申请buffer : 通过 ByteBuffer.allocate(int size) 申请缓冲区,单位是字节(Byte)
写入数据:通过channel的read 方法,向buffer中写入数据,方法的返回值是本次读取的数据的长度,-1时表示本次没有读取到数据
读取数据:首先通过buffer.flip(); 切换成读模式,然后通过buffer.get()获取当前position指针指向位置的一个字节,position指针 自动右移
循环读取:通过buffer.hasRemaining()判断position的下一个位置是否还有数据,返回boolean
1 2 3 4 public final boolean hasRemaining () { return position < limit; }
清空buffer: buffer.clear()清空
实际上是通过 调用 clear() 或者compact()切换至写模式
clear
1 2 3 4 5 6 7 public Buffer clear () { position = 0 ; limit = capacity; mark = -1 ; return this ; }
compact
1 2 3 4 5 6 7 8 9 10 11 12 public ByteBuffer compact () { int pos = position(); int lim = limit(); assert (pos <= lim); int rem = (pos <= lim ? lim - pos : 0 ); System.arraycopy(hb, ix(pos), hb, ix(0 ), rem); position(rem); limit(capacity()); discardMark(); return this ; }
代码示例
1
2
3
4
5
6
7
8
9
10
11
12
13
14
15
16
17
18
19
20
21
22
23
24
static void testBuffer () { try (FileChannel channel = new FileInputStream ("data.txt" ).getChannel()) { ByteBuffer buffer = ByteBuffer.allocate(10 ); while (true ) { int len = channel.read(buffer); if (len == -1 ) { break ; } log.info("本次读取到的字节数: {}" , len); buffer.flip(); while (buffer.hasRemaining()) { System.out.print((char ) buffer.get()); } System.out.println(); buffer.clear(); } } catch (Exception e) { log.error(e.getMessage()); } }
代码打印结果
1
2
3
4
21:59:07.879 [main] INFO com.dhx.c1.TestByteBufferRW - 本次读取到的字节数: 10 1234567890 21:59:07.884 [main] INFO com.dhx.c1.TestByteBufferRW - 本次读取到的字节数: 3 abc
演示
准备
创建项目
导入依赖
1 2 3 4 5 6 7 8 9 10 11 12 13 14 15 16 17 18 19 20 21 22 23 24 25 26 27 <dependencies > <dependency > <groupId > com.google.code.gson</groupId > <artifactId > gson</artifactId > <version > 2.9.1</version > </dependency > <dependency > <groupId > ch.qos.logback</groupId > <artifactId > logback-classic</artifactId > <version > 1.2.11</version > </dependency > <dependency > <groupId > org.projectlombok</groupId > <artifactId > lombok</artifactId > <version > 1.18.24</version > </dependency > <dependency > <groupId > io.netty</groupId > <artifactId > netty-all</artifactId > <version > 4.1.84.Final</version > </dependency > <dependency > <groupId > com.google.guava</groupId > <artifactId > guava</artifactId > <version > 30.0-jre</version > </dependency > </dependencies >
ByteBuffer调试工具类
用于展示ByteBuffer的实际情况
1
2
3
4
5
6
7
8
9
10
11
12
13
14
15
16
17
18
19
20
21
22
23
24
25
26
27
28
29
30
31
32
33
34
35
36
37
38
39
40
41
42
43
44
45
46
47
48
49
50
51
52
53
54
55
56
57
58
59
60
61
62
63
64
65
66
67
68
69
70
71
72
73
74
75
76
77
78
79
80
81
82
83
84
85
86
87
88
89
90
91
92
93
94
95
96
97
98
99
100
101
102
103
104
105
106
107
108
109
110
111
112
113
114
115
116
117
118
119
120
121
122
123
124
125
126
127
128
129
130
131
132
133
134
135
136
137
138
139
140
141
142
143
144
145
146
147
148
149
150
151
152
153
154
155
156
157
158
159
160
161
162
163
164
165
166
167
168
169
170
171
172
173
174
175
176
177
178
179
180
181
import io.netty.util.internal.StringUtil;import java.nio.ByteBuffer;import static io.netty.util.internal.MathUtil.isOutOfBounds;import static io.netty.util.internal.StringUtil.NEWLINE;public class ByteBufferUtil { private static final char [] BYTE2CHAR = new char [256 ]; private static final char [] HEXDUMP_TABLE = new char [256 * 4 ]; private static final String[] HEXPADDING = new String [16 ]; private static final String[] HEXDUMP_ROWPREFIXES = new String [65536 >>> 4 ]; private static final String[] BYTE2HEX = new String [256 ]; private static final String[] BYTEPADDING = new String [16 ]; static { final char [] DIGITS = "0123456789abcdef" .toCharArray(); for (int i = 0 ; i < 256 ; i++) { HEXDUMP_TABLE[i << 1 ] = DIGITS[i >>> 4 & 0x0F ]; HEXDUMP_TABLE[(i << 1 ) + 1 ] = DIGITS[i & 0x0F ]; } int i; for (i = 0 ; i < HEXPADDING.length; i++) { int padding = HEXPADDING.length - i; StringBuilder buf = new StringBuilder (padding * 3 ); for (int j = 0 ; j < padding; j++) { buf.append(" " ); } HEXPADDING[i] = buf.toString(); } for (i = 0 ; i < HEXDUMP_ROWPREFIXES.length; i++) { StringBuilder buf = new StringBuilder (12 ); buf.append(NEWLINE); buf.append(Long.toHexString(i << 4 & 0xFFFFFFFFL | 0x100000000L )); buf.setCharAt(buf.length() - 9 , '|' ); buf.append('|' ); HEXDUMP_ROWPREFIXES[i] = buf.toString(); } for (i = 0 ; i < BYTE2HEX.length; i++) { BYTE2HEX[i] = ' ' + StringUtil.byteToHexStringPadded(i); } for (i = 0 ; i < BYTEPADDING.length; i++) { int padding = BYTEPADDING.length - i; StringBuilder buf = new StringBuilder (padding); for (int j = 0 ; j < padding; j++) { buf.append(' ' ); } BYTEPADDING[i] = buf.toString(); } for (i = 0 ; i < BYTE2CHAR.length; i++) { if (i <= 0x1f || i >= 0x7f ) { BYTE2CHAR[i] = '.' ; } else { BYTE2CHAR[i] = (char ) i; } } } public static void debugAll (ByteBuffer buffer) { int oldlimit = buffer.limit(); buffer.limit(buffer.capacity()); StringBuilder origin = new StringBuilder (256 ); appendPrettyHexDump(origin, buffer, 0 , buffer.capacity()); System.out.println("+--------+-------------------- all ------------------------+----------------+" ); System.out.printf("position: [%d], limit: [%d]\n" , buffer.position(), oldlimit); System.out.println(origin); buffer.limit(oldlimit); } public static void debugRead (ByteBuffer buffer) { StringBuilder builder = new StringBuilder (256 ); appendPrettyHexDump(builder, buffer, buffer.position(), buffer.limit() - buffer.position()); System.out.println("+--------+-------------------- read -----------------------+----------------+" ); System.out.printf("position: [%d], limit: [%d]\n" , buffer.position(), buffer.limit()); System.out.println(builder); } private static void appendPrettyHexDump (StringBuilder dump, ByteBuffer buf, int offset, int length) { if (isOutOfBounds(offset, length, buf.capacity())) { throw new IndexOutOfBoundsException ( "expected: " + "0 <= offset(" + offset + ") <= offset + length(" + length + ") <= " + "buf.capacity(" + buf.capacity() + ')' ); } if (length == 0 ) { return ; } dump.append( " +-------------------------------------------------+" + NEWLINE + " | 0 1 2 3 4 5 6 7 8 9 a b c d e f |" + NEWLINE + "+--------+-------------------------------------------------+----------------+" ); final int startIndex = offset; final int fullRows = length >>> 4 ; final int remainder = length & 0xF ; for (int row = 0 ; row < fullRows; row++) { int rowStartIndex = (row << 4 ) + startIndex; appendHexDumpRowPrefix(dump, row, rowStartIndex); int rowEndIndex = rowStartIndex + 16 ; for (int j = rowStartIndex; j < rowEndIndex; j++) { dump.append(BYTE2HEX[getUnsignedByte(buf, j)]); } dump.append(" |" ); for (int j = rowStartIndex; j < rowEndIndex; j++) { dump.append(BYTE2CHAR[getUnsignedByte(buf, j)]); } dump.append('|' ); } if (remainder != 0 ) { int rowStartIndex = (fullRows << 4 ) + startIndex; appendHexDumpRowPrefix(dump, fullRows, rowStartIndex); int rowEndIndex = rowStartIndex + remainder; for (int j = rowStartIndex; j < rowEndIndex; j++) { dump.append(BYTE2HEX[getUnsignedByte(buf, j)]); } dump.append(HEXPADDING[remainder]); dump.append(" |" ); for (int j = rowStartIndex; j < rowEndIndex; j++) { dump.append(BYTE2CHAR[getUnsignedByte(buf, j)]); } dump.append(BYTEPADDING[remainder]); dump.append('|' ); } dump.append(NEWLINE + "+--------+-------------------------------------------------+----------------+" ); } private static void appendHexDumpRowPrefix (StringBuilder dump, int row, int rowStartIndex) { if (row < HEXDUMP_ROWPREFIXES.length) { dump.append(HEXDUMP_ROWPREFIXES[row]); } else { dump.append(NEWLINE); dump.append(Long.toHexString(rowStartIndex & 0xFFFFFFFFL | 0x100000000L )); dump.setCharAt(dump.length() - 9 , '|' ); dump.append('|' ); } } public static short getUnsignedByte (ByteBuffer buffer, int index) { return (short ) (buffer.get(index) & 0xFF ); } }
示例
1
2
3
4
5
6
7
8
9
10
11
12
13
14
15
16
17
18
19
20
21
22
@Slf4j public class TestByteBufferRW { public static void main (String[] args) { testBBRW(); } static void testBBRW () { ByteBuffer buffer = ByteBuffer.allocate(10 ); buffer.put((byte ) 0x61 ); buffer.put(new byte []{0x62 , 0x63 , 0x64 }); debugAll(buffer); buffer.flip(); byte b = buffer.get(); log.info(String.valueOf((char ) b)); buffer.compact(); buffer.put((byte ) 0x69 ); buffer.put((byte ) 0x69 ); buffer.put((byte ) 0x69 ); debugAll(buffer); } }
运行结果
1 2 3 4 5 6 7 8 9 10 11 12 13 14 15 16 17 18 19 20 21 22 23 24 25 26 27 28 29 30 31 32 +--------+-------------------- all ------------------------+----------------+ position: [1 ], limit: [10 ] +-------------------------------------------------+ | 0 1 2 3 4 5 6 7 8 9 a b c d e f | +--------+-------------------------------------------------+----------------+ |00000000 | 61 00 00 00 00 00 00 00 00 00 |a......... | +--------+-------------------------------------------------+----------------+ +--------+-------------------- all ------------------------+----------------+ position: [4 ], limit: [10 ] +-------------------------------------------------+ | 0 1 2 3 4 5 6 7 8 9 a b c d e f | +--------+-------------------------------------------------+----------------+ |00000000 | 61 62 63 64 00 00 00 00 00 00 |abcd...... | +--------+-------------------------------------------------+----------------+ +--------+-------------------- all ------------------------+----------------+ position: [0 ], limit: [4 ] +-------------------------------------------------+ | 0 1 2 3 4 5 6 7 8 9 a b c d e f | +--------+-------------------------------------------------+----------------+ |00000000 | 61 62 63 64 00 00 00 00 00 00 |abcd...... | +--------+-------------------------------------------------+----------------+ +--------+-------------------- all ------------------------+----------------+ position: [7 ], limit: [10 ] +-------------------------------------------------+ | 0 1 2 3 4 5 6 7 8 9 a b c d e f | +--------+-------------------------------------------------+----------------+ |00000000 | 61 62 63 64 69 69 69 00 00 00 |abcdiii... | +--------+-------------------------------------------------+----------------+
属性&方法
字节缓冲区的父类Buffer中有几个核心属性,如下
1 2 3 4 5 private int mark = -1 ;private int position = 0 ;private int limit;private int capacity;Copy
capacity :缓冲区的容量 。通过构造函数赋予,一旦设置,无法更改 limit :缓冲区的界限 。位于limit 后的数据不可读写。缓冲区的限制不能为负,并且不能大于其容量 position :下一个 读写位置的索引(类似PC)。缓冲区的位置不能为负,并且不能大于limit mark :记录当前position的值。position被改变后,可以通过调用reset() 方法恢复到mark的位置。
以上四个属性必须满足以下要求
mark <= position <= limit <= capacity
put()
put()方法可以将一个数据放入到缓冲区中。
进行该操作后,postition的值会+1,指向下一个可以放入的位置。capacity = limit ,为缓冲区容量的值。
flip()
切换对缓冲区的操作模式 ,由写->读 / 读->写
进行该操作后
如果是写模式->读模式,position = 0 , limit 指向最后一个元素的下一个位置,capacity不变
如果是读->写,则恢复为put()方法中的值
1 2 3 4 5 6 7 public Buffer flip () { limit = position; position = 0 ; mark = -1 ; return this ; }
get()
get()方法会读取缓冲区中的一个值
进行该操作后,position会+1 ,如果超过了limit则会抛出异常
注意:get(i)方法不会改变position的值
1 2 3 4 5 6 7 8 9 10 11 12 13 14 15 16 public byte get () { try { return ((UNSAFE.getByte(ix(nextGetIndex())))); } finally { Reference.reachabilityFence(this ); } } final int nextGetIndex () { int p = position; if (p >= limit) throw new BufferUnderflowException (); position = p + 1 ; return p; }
rewind()
该方法只能在读模式下使用
rewind()方法后,会恢复position、limit和capacity的值,变为进行get()前的值
clean()
clean()方法会将缓冲区中的各个属性恢复为最初的状态,position = 0, capacity = limit
此时缓冲区的数据依然存在 ,处于“被遗忘”状态,下次进行写操作时会覆盖这些数据
1 2 3 4 5 6 7 public Buffer clear () { position = 0 ; limit = capacity; mark = -1 ; return this ; }
示例代码
1
2
3
4
5
6
7
8
9
10
static void testClean () { ByteBuffer buffer = ByteBuffer.allocate(10 ); buffer.put(new byte []{0x61 ,0x62 , 0x63 , 0x64 }); debugAll(buffer); buffer.flip(); System.out.println((char ) buffer.get()); System.out.println((char ) buffer.get()); buffer.clear(); debugAll(buffer); }
mark()&reset()
示例代码
1 2 3 4 5 6 7 8 9 10 11 static void testMark () { ByteBuffer buffer = ByteBuffer.allocate(10 ); buffer.put(new byte []{0x61 ,0x62 , 0x63 , 0x64 }); buffer.flip(); buffer.mark(); System.out.println((char ) buffer.get()); System.out.println((char ) buffer.get()); buffer.reset(); System.out.println((char ) buffer.get()); System.out.println((char ) buffer.get()); }
代码的打印结果为
compact()
此方法为ByteBuffer的方法,而不是Buffer的方法
compact会把未读完的数据向前压缩 ,然后切换到写模式
数据前移后,原位置的值并未清零,写时会覆盖 之前的值
示例代码
1 2 3 4 5 6 7 8 9 10 11 12 13 static void testCompact () { ByteBuffer buffer = ByteBuffer.allocate(10 ); buffer.put(new byte []{0x61 ,0x62 , 0x63 , 0x64 }); debugAll(buffer); buffer.flip(); System.out.println((char ) buffer.get()); System.out.println((char ) buffer.get()); buffer.compact(); debugAll(buffer); buffer.put((byte ) 0x65 ); buffer.put((byte ) 0x66 ); debugAll(buffer); }
打印结果如下
1 2 3 4 5 6 7 8 9 10 11 12 13 14 15 16 17 18 19 20 21 22 23 +--------+-------------------- all ------------------------+----------------+ position: [4 ], limit: [10 ] +-------------------------------------------------+ | 0 1 2 3 4 5 6 7 8 9 a b c d e f | +--------+-------------------------------------------------+----------------+ |00000000 | 61 62 63 64 00 00 00 00 00 00 |abcd...... | +--------+-------------------------------------------------+----------------+ a b +--------+-------------------- all ------------------------+----------------+ position: [2 ], limit: [10 ] +-------------------------------------------------+ | 0 1 2 3 4 5 6 7 8 9 a b c d e f | +--------+-------------------------------------------------+----------------+ |00000000 | 63 64 63 64 00 00 00 00 00 00 |cdcd...... | +--------+-------------------------------------------------+----------------+ +--------+-------------------- all ------------------------+----------------+ position: [4 ], limit: [10 ] +-------------------------------------------------+ | 0 1 2 3 4 5 6 7 8 9 a b c d e f | +--------+-------------------------------------------------+----------------+ |00000000 | 63 64 65 66 00 00 00 00 00 00 |cdef...... | +--------+-------------------------------------------------+----------------+
可以看到在compact之后,虽然数据2 3 位置的数据还在,可是实际上已经是属于被舍弃的数据 了,在我们继续写入之后,原本2 3 位置的数据直接被覆盖。
clear() 与 compact()对比
clear 会对position、limit、mark进行重置,compact 在对position进行设置,以及limit、mark进行重置的同时,还涉及到数据在内存中拷贝(会调用arraycopy)。
**所以compact比clear更耗性能。**但compact能保存你未读取的数据,将新数据追加到为读取的数据之后;而clear则不行,若你调用了clear,则未读取的数据就无法再读取到了
所以需要根据情况来判断使用哪种方法进行模式切换
批量读取 & 写入
首先,既然涉及到了数据的读取以及写入,那么我们有必要来学习字符串与ByteBuffer的转换的几个方法
String -> ByteBuffer
通过String.getBytes()
通过 StandardCharsets.UTF_8.encode(String str)
通过ByteBuffer.wrap(String str)
需要注意的是,2 3 两种方法都会默认吧ByteBuffer的模式切换成读模式,而1 需要手动切换
ByteBuffer->String
通过 StandardCharsets.UTF_8.decode(ByteBuffer buffer).toString()
1 2 3 4 5 6 7 8 9 10 11 12 13 14 15 16 static void testString () { String hello = "hello" ; ByteBuffer buffer = ByteBuffer.allocate(16 ); buffer.put(hello.getBytes()); ByteBuffer buffer2 = StandardCharsets.UTF_8.encode("hello" ); debugAll(buffer); debugAll(buffer2); ByteBuffer buffer3 = ByteBuffer.wrap("hello" .getBytes()); debugAll(buffer3); String s = StandardCharsets.UTF_8.decode(buffer2).toString(); System.out.println(s); }
使用RandomAccessFile以及FileChannel
1 2 3 public class RandomAccessFile implements DataOutput , DataInput, Closeable {... }
RandomAccessFile类实现了DataInput和DataOutput接口,这意味着它可以对文件进行二进制数据的读写操作。使用RandomAccessFile可以完成以下操作:
从文件指定位置读取数据
向文件指定位置写入数据
获取文件长度
移动文件指针到指定位置
创建RandomAccessFiled对象的时候,通过设置mode 参数 , 来设定对文件进行 读 or 写
mode="r" mode="w"
1 2 3 4 5 6 7 8 9 10 11 12 13 14 15 16 17 18 19 20 21 22 23 24 25 26 27 28 29 30 31 32 33 34 35 static void testGatheringWrite () { ByteBuffer b1 = StandardCharsets.UTF_8.encode("hello" ); ByteBuffer b2 = StandardCharsets.UTF_8.encode("world" ); ByteBuffer b3 = StandardCharsets.UTF_8.encode("adorabled4" ); try (FileChannel channel = new RandomAccessFile ("result.txt" ,"rw" ).getChannel()) { channel.write(new ByteBuffer []{b1,b2,b3}); } catch (IOException e) { throw new RuntimeException (e); } } static void testScatteringReads () { try (FileChannel channel = new RandomAccessFile ("words.txt" , "r" ).getChannel()){ ByteBuffer b1 = ByteBuffer.allocate(16 ); ByteBuffer b2 = ByteBuffer.allocate(16 ); ByteBuffer b3 = ByteBuffer.allocate(16 ); channel.read(new ByteBuffer []{b1,b2,b3}); b1.flip(); b2.flip(); b3.flip(); System.out.println(StandardCharsets.UTF_8.decode(b1).toString()); System.out.println(StandardCharsets.UTF_8.decode(b2).toString()); System.out.println(StandardCharsets.UTF_8.decode(b3).toString()); }catch (IOException e) { throw new RuntimeException (e); } }
参考内容
