最近在阅读 河北王校长 出版的 《贯穿设计模式》,刚好趁着这个机会给之前的BI项目扩展第三方登录
贯穿设计模式 : https://book.douban.com/subject/36579987/
这一章节 书中主要展示了以 适配器模式 以及 桥接模式 进行实践, 主要集成了 Gitee 的第三方登录
单从本章来讲(后面的还没有读完) , 阅读下来还是感觉非常友好的 , 作者对每一个要点都讲解的非常详细 , 并且配备了非常有趣的实际需求场景 , 非常适合像我这样不熟悉设计模式的小白去阅读
计划随着阅读进度对进行相应的实践 , 同时能扩展项目就更好了
本文主要结合作者的讲解 , 完整地实践通过适配器模式, 桥接模式 将原本的项目(BI Project)改造成为支持第三方登录。
完整前后端代码请参考
具体的三方登录的代码可通过最近的提交来查看 (日期: 2023年11月14日)
再此之前, 我们先从用户的角度 , 来看看第三方登录的流程
3rd登录流程
以CSDN为例
首先我们点击 前端的 icon (比如github)

接着会跳出 一个新的窗口
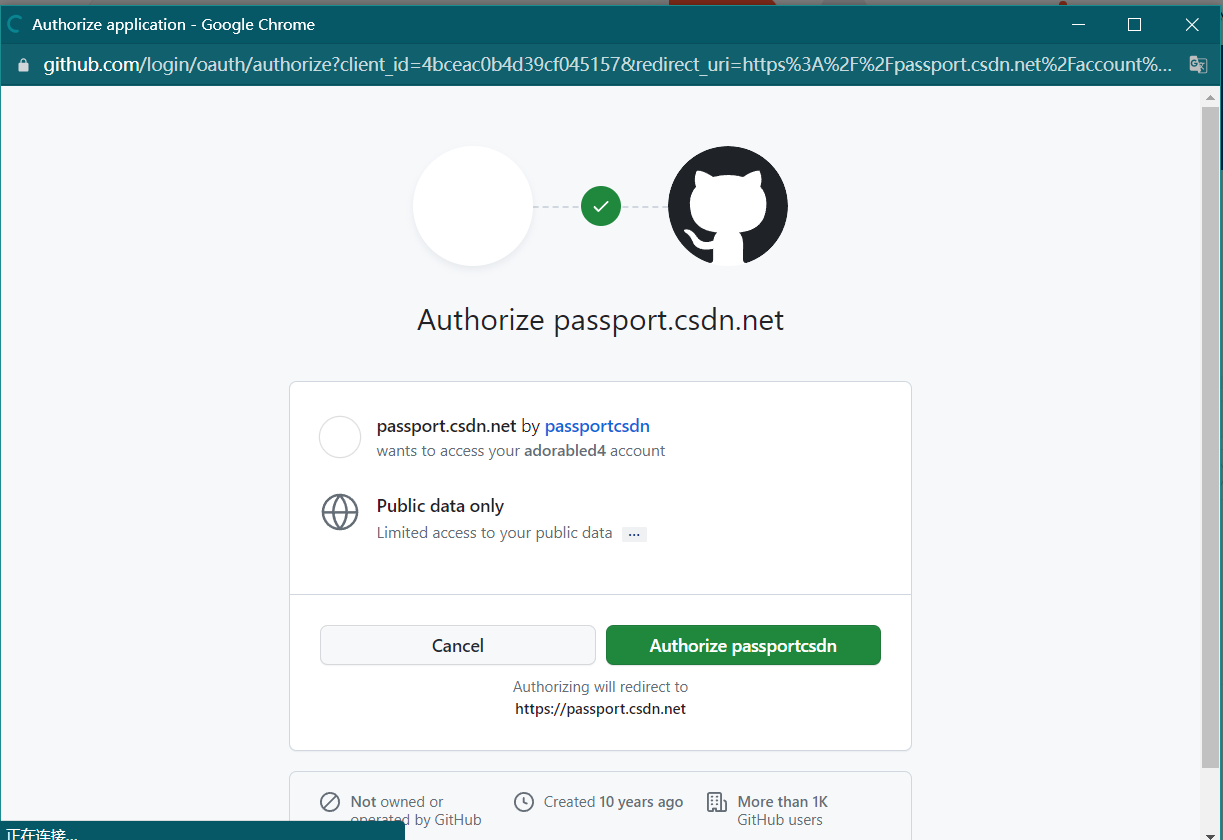
这里可以注意一下此页面的url
https://github.com/login/oauth/authorize?client_id=4bceac0b4d39cf045157&redirect_uri=https%3A%2F%2Fpassport.csdn.net%2Faccount%2Flogin%3FpcAuthType%3Dgithub%26newAuth%3Dtrue%26state%3Dtest
上面的参数有 :
- client_id : 4bceac0b4d39cf045157
- redirect_uri : https%3A%2F%2Fpassport.csdn.net%2Faccount%2Flogin%3FpcAuthType%3Dgithub%26newAuth%3Dtrue%26state%3Dtest
通过解码工具 我们可以 得知 redirect_uri 为
https://passport.csdn.net/account/login?pcAuthType=github&newAuth=true&state=test
点击授权 , 显示登录成功 , 稍后跳转
我们解码 此时的 url : https://passport.csdn.net/middle?redirectUrl=https://passport.csdn.net/sign#callback

那么在上面的第三方登录过程中 , 可以注意到几个关键的 参数 以及 url
- client_id
https://passport.csdn.net/account/login?pcAuthType=github&newAuth=true&state=testhttps://passport.csdn.net/middle?redirectUrl=https://passport.csdn.net/sign#callback
上面的主要流程就是 :
- 用户点击 ICON , 跳转到 GitHub。
- GitHub 要求用户登录,然后询问"CSDN 要求获得 xx 权限,你是否同意?"
- 用户同意,GitHub 就会重定向回 CSDN ,同时发回一个授权码。
- CSDN 使用授权码,向 GitHub 请求令牌。
- GitHub 返回令牌.
- CSDN 使用令牌,向 GitHub 请求用户数据。
实际上 4 5 6 步骤 , 对于用户来说都是无感的 , 这也是我们待会需要注意的地方。
注意 , 在开发某个新特性之前 , 首先从dev签出一个新的分支 , 这里分别定义为
feature/3rdLogin-adapterfeature/3rdLogin-bridge

适配器模式
介绍
将一个接口转换为客户端所期待的接口,从而使两个接口不兼容的类可以在一起工作
适配器模式主要用于功能的扩展 , 同时需要适配之前的功能
适配器模式还有个别名叫:Wrapper(包装器),顾名思义就是将目标类用一个新 类包装一下,相当于在客户端与目标类直接加了一层。
IT世界有句俗语:没有什么问题是加一层不能解决的
原本的 用户登录 实现方式是 邮箱登录 以及 邮箱验证码登录
问就是短信服务买不起只能用免费的邮箱 2333
Gitee
一般来讲 , 我们在学习一门不熟悉 , 没有经验的 技术的时候 , 最快的学习方法就是 官方文档 : https://gitee.com/api/v5/oauth_doc#/list-item-1
实际上找了很多blog , 一方面是时间问题很多应用的示例都过于久远 或者是 代码不够优雅 ,甚至还有 给出 淘宝链接 点击购买的2333
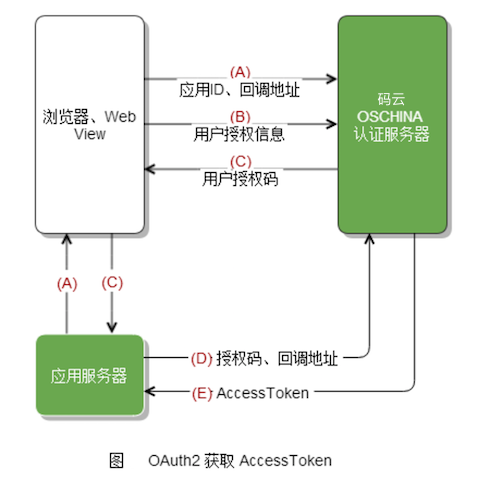
首先在 gitee 创建第三方应用 , https://gitee.com/oauth/applications , 接着获取到 我们的 clientId 以及 clientSecret
配置信息
1
2
3
4
5
6
7
| gitee.clientId = xxxxxxxxxxxxxxxxxxxxxxxxxxxxcb49e54
gitee.clientSecret = xxxxxxxxxxxxxxxxxxxxb0d396bbc614
gitee.state= GITEE
gitee.redirectUri = http://localhost:6848/gitee/callback
gitee.token.url= https://gitee.com/oauth/token?grant_type=authorization_code&client_id=${gitee.clientId}&redirect_uri=${gitee.redirectUri}&client_secret=${gitee.clientSecret}&code=
gitee.user.url = https://gitee.com/api/v5/user?access_token=
gitee.user.prefix=${gitee.state}
|
更多 API开放平台信息请 查看 https://gitee.com/api/v5/swagger#/getV5ReposOwnerRepoStargazers?ex=no
httpUtil
这里由于授权用户的信息很多 , 并且为了方便之后 扩展其他的登录方式 且 避免 类膨胀的问题 , 通过 HttpUtil以及JSONObject的方式 来 访问具体的数据
https://gitee.com/api/v5/swagger#/getV5User
比如gitee获取授权用户的信息 , 字段是非常多的, 如果一个一个手动创建类就非常的麻烦
1
2
3
4
5
6
7
8
9
10
11
12
13
14
15
16
17
18
19
20
21
22
23
24
25
26
27
28
29
30
31
32
| {
"avatar_url": string
"bio": string
"blog": string
"created_at": string
"email": string
"events_url": string
"followers": string
"followers_url": string
"following": string
"following_url": string
"gists_url": string
"html_url": string
"id": integer
"login": string
"member_role": string
"name": string
"organizations_url": string
"public_gists": string
"public_repos": string
"received_events_url": string
"remark": string
"repos_url": string
"stared": string
"starred_url": string
"subscriptions_url": string
"type": string
"updated_at": string
"url": string
"watched": string
"weibo": string
}
|
那么定义httpUtil如下
1
2
3
4
5
6
7
8
9
10
11
12
13
14
15
16
17
18
19
20
21
22
23
24
25
26
27
28
29
30
31
32
33
34
| import cn.hutool.json.JSONObject;
import cn.hutool.json.JSONUtil;
import org.apache.http.HttpEntity;
import org.apache.http.client.methods.HttpGet;
import org.apache.http.client.methods.HttpPost;
import org.apache.http.client.methods.HttpRequestBase;
import org.apache.http.impl.client.CloseableHttpClient;
import org.apache.http.impl.client.HttpClients;
import org.apache.http.util.EntityUtils;
import org.springframework.http.HttpMethod;
import java.io.IOException;
public class HttpUtil {
public static final JSONObject execute(String url, HttpMethod method) {
HttpRequestBase http = null;
CloseableHttpClient client = null;
try {
client = HttpClients.createDefault();
if (method.equals(HttpMethod.GET)) {
http = new HttpGet(url);
} else {
http = new HttpPost(url);
}
HttpEntity entity = client.execute(http).getEntity();
return JSONUtil.parseObj(EntityUtils.toString(entity));
} catch (IOException e) {
throw new RuntimeException(e);
} finally {
http.releaseConnection();
}
}
}
|
适配器实现
这里我们的适配器 类 继承了 原本的userService , 因此在启动springboot的时候需要把原本 userServiceImpl 上面的@service 注释掉
这里就是我们的核心内容了 : 实现具体的登录逻辑
经过了前面的配置, 这里的代码实际上也十分简单
- 回调接口接收到 (state , code)
- 后端通过code 访问/oauth/token 获取access_token
- 通过 access_token访问 /api/v5/user 获取授权用户信息
- 执行注册/登录逻辑
这里由于我原本的后端 是 通过 邮箱注册 , 登录的, 因此 获取用户的email然后执行原本的quickLogin 方法
原书中是定义了 用户的password为用户名, 这里考虑到可能用户原本已经注册了 账户 (并且修改了密码), 如果还使用 默认的 用户名作为密码登录可能会出现登录失败的情况
主要代码如下
1
2
3
4
5
6
7
8
9
10
11
12
13
14
15
16
17
18
19
20
21
22
23
24
25
26
27
28
29
30
31
32
33
34
35
36
37
38
39
40
41
42
43
| import cn.hutool.json.JSONObject;
import com.dhx.bi.common.BaseResponse;
import com.dhx.bi.common.ErrorCode;
import com.dhx.bi.model.DO.UserEntity;
import com.dhx.bi.service.Login3rdTarget;
import com.dhx.bi.utils.HttpUtil;
import com.dhx.bi.utils.ResultUtil;
import lombok.extern.slf4j.Slf4j;
import org.springframework.beans.factory.annotation.Value;
import org.springframework.http.HttpMethod;
import org.springframework.stereotype.Component;
@Slf4j
@Component
public class Login3rdAdapter extends UserServiceImpl implements Login3rdTarget {
@Value("${gitee.state}")
private String giteeState;
@Value("${gitee.token.url}")
private String giteeTokenUrl;
@Value("${gitee.user.url}")
private String giteeUserUrl;
@Override
public BaseResponse loginByGitee(String code, String state) {
if (!giteeState.equals(state)) {
throw new UnsupportedOperationException("state不匹配");
}
String tokenUrl = giteeTokenUrl.concat(code);
JSONObject accessToken = HttpUtil.execute(tokenUrl, HttpMethod.GET);
String userUrl = giteeUserUrl.concat((String) accessToken.get("access_token"));
JSONObject userInfo = HttpUtil.execute(userUrl, HttpMethod.GET);
String email = (String) userInfo.get("email");
String password = email;
return autoRegister3rdAndLogin(email, password);
}
private BaseResponse autoRegister3rdAndLogin(String email) {
return super.quickLogin(email);
}
}
|
quickLogin方法如下:
1
2
3
4
5
6
7
8
9
10
11
12
13
14
15
16
17
| public BaseResponse quickLogin(String email) {
List<UserEntity> users = list(new QueryWrapper<UserEntity>().eq("email", email));
UserEntity user;
if (users == null || users.size() == 0) {
user = quickRegister(email);
} else {
user = users.get(0);
}
String token = jwtTokensService.generateAccessToken(user);
String refreshToken = jwtTokensService.generateRefreshToken(user);
JwtToken jwtToken = new JwtToken(token, refreshToken);
jwtTokensService.save2Redis(jwtToken, user);
return ResultUtil.success(token);
}
|
测试
首先访问 https://gitee.com/oauth/authorize?client_id={client_id}&redirect_uri={redirect_uri}&response_type=code
注意数据需要与我们的配置文件对应
点击同意授权
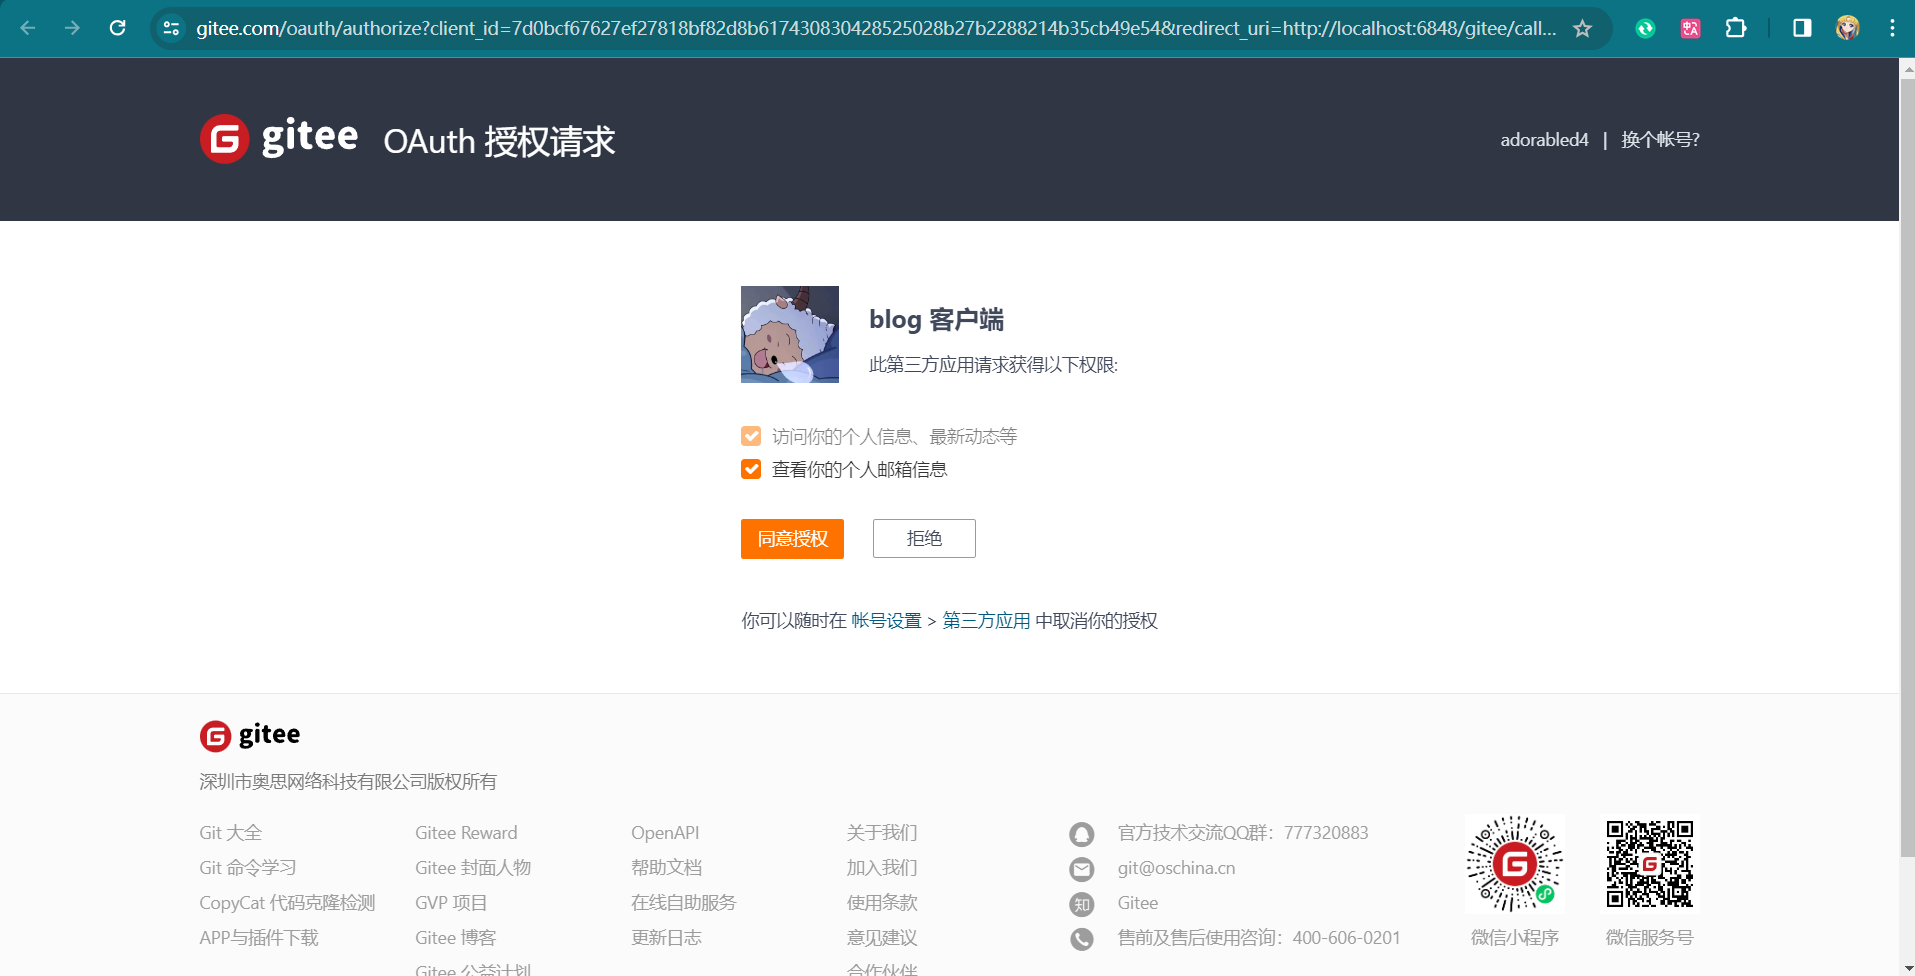
接着 我们的后端回调接口会收到请求

其中 accessToken 返回值为
1
| {"access_token":"84ece2eaa687165acbe5ecc5e6c7a482","token_type":"bearer","expires_in":86400,"refresh_token":"13080c0b4ce8e93e13cd746549bdfbbad49b1f09a79c4eda31bf374a51f06167","scope":"user_info emails","created_at":1699934719}
|
userInfo的返回值为
1
2
3
4
5
6
7
8
9
10
11
12
13
14
15
16
17
18
19
20
21
22
23
24
25
26
27
28
29
30
31
| {
"id": 10665327,
"login": "adorabled4",
"name": "adorabled4",
"avatar_url": "https://gitee.com/assets/no_portrait.png",
"url": "https://gitee.com/api/v5/users/adorabled4",
"html_url": "https://gitee.com/adorabled4",
"remark": "",
"followers_url": "https://gitee.com/api/v5/users/adorabled4/followers",
"following_url": "https://gitee.com/api/v5/users/adorabled4/following_url{/other_user}",
"gists_url": "https://gitee.com/api/v5/users/adorabled4/gists{/gist_id}",
"starred_url": "https://gitee.com/api/v5/users/adorabled4/starred{/owner}{/repo}",
"subscriptions_url": "https://gitee.com/api/v5/users/adorabled4/subscriptions",
"organizations_url": "https://gitee.com/api/v5/users/adorabled4/orgs",
"repos_url": "https://gitee.com/api/v5/users/adorabled4/repos",
"events_url": "https://gitee.com/api/v5/users/adorabled4/events{/privacy}",
"received_events_url": "https://gitee.com/api/v5/users/adorabled4/received_events",
"type": "User",
"blog": null,
"weibo": null,
"bio": null,
"public_repos": 1,
"public_gists": 0,
"followers": 0,
"following": 1,
"stared": 3,
"watched": 3,
"created_at": "2022-03-27T18:50:13+08:00",
"updated_at": "2023-11-14T10:26:00+08:00",
"email": "dhx2648466390@163.com"
}
|
到这里我们的测试页基本结束了
最后的 结构如下

Github
有了前面的基础 , 我们在之后扩展别的平台登录的时候只需要添加核心的代码和配置即可。
首先在 github 创建 自己的第三方应用
详情参考 : https://docs.github.com/zh/apps/oauth-apps/maintaining-oauth-apps/modifying-an-oauth-app
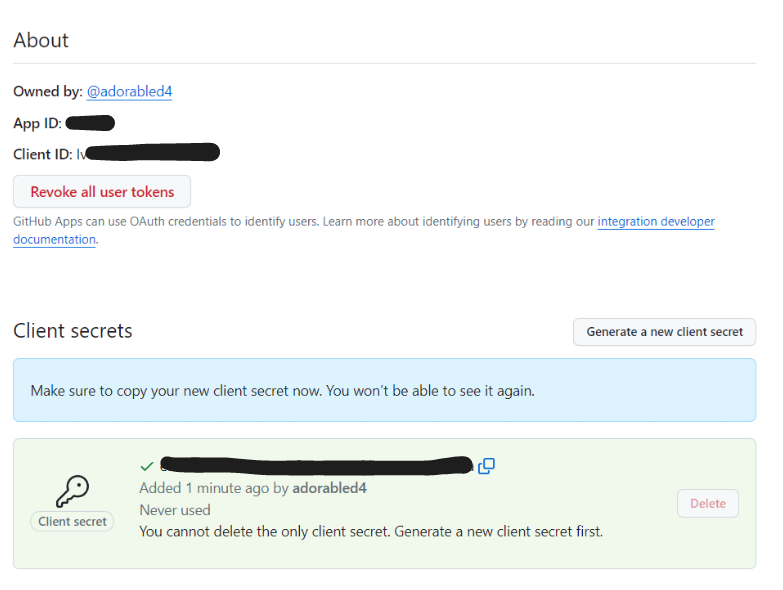
授权应用程序用户的 web 应用程序流程是:
- 用户被重定向,以请求他们的 GitHub 身份
- 用户被 GitHub 重定向回您的站点
- 您的应用程序使用用户的访问令牌访问 API
详细的配置信息请参考 官方文档 : https://docs.github.com/zh/apps/oauth-apps/building-oauth-apps/authorizing-oauth-apps
这里主要给出 基本的代码 以及 配置方式
总体上与Gitee的请求方式与参数是非常相似的, 不需要做很大的改动
配置信息
1
2
3
4
5
6
7
| github.clientId = Iv1.89f4b0b049ff2ecf
github.clientSecret = e98c2d6080dc6c3a8f09198c2dd2866549cafc0a
github.state= GITHUB
github.redirectUri = http://localhost:6848/api/login3rd/github/callback
github.token.url= https://github.com/oauth/token?grant_type=authorization_code&client_id=${gitee.clientId}&redirect_uri=${gitee.redirectUri}&client_secret=${gitee.clientSecret}&code=
github.user.url = https://github.com/api/v5/user
github.user.prefix=${github.state}
|
核心代码
注意github在访问 授权用户的 信息的时候需要把 access_token设置到 请求头中
1
2
| Authorization: Bearer OAUTH-TOKEN
GET https://api.github.com/user
|
这里使用了 Hutool的HttpUtil
1
2
3
4
5
6
7
8
9
10
11
12
13
14
15
16
17
18
19
20
21
22
23
24
25
26
27
28
29
30
31
| @Override
public BaseResponse loginByGithub(String state,String code) {
if (!githubState.equals(state)) {
throw new UnsupportedOperationException("state不匹配");
}
String tokenUrl = githubTokenUrl.concat(code);
String result = HttpUtil.post(tokenUrl, "");
Map<String, String> resultMap = splitGithubAccessToken(result);
String accessToken = resultMap.get("access_token");
log.info("github 返回值:{}", result);
String userUrl = githubUserUrl.concat(accessToken);
JSONObject userInfo = JSONUtil.parseObj(HttpUtil.post(userUrl, ""));
log.info("github 返回userInfo:{}", userInfo);
String email = (String) userInfo.get("email");
return autoRegister3rdAndLogin(email);
}
private Map<String,String> splitGithubAccessToken(String data){
Map<String, String> result = new HashMap<>();
Arrays.stream(data.split("&"))
.forEach(entry -> {
String[] keyValue = entry.split("=");
if (keyValue.length == 2) {
result.put(keyValue[0], keyValue[1]);
}
});
System.out.println(result);
return result;
}
|
测试
访问 https://github.com/login/oauth/authorize?client_id=${client_id}&redirect_uri=${redirect_uri}&scope=user&state=GITHUB
实际的项目中在前端 的页面设置一个ICON , 然后 用户点击之后跳转到这个链接进行操作即可。
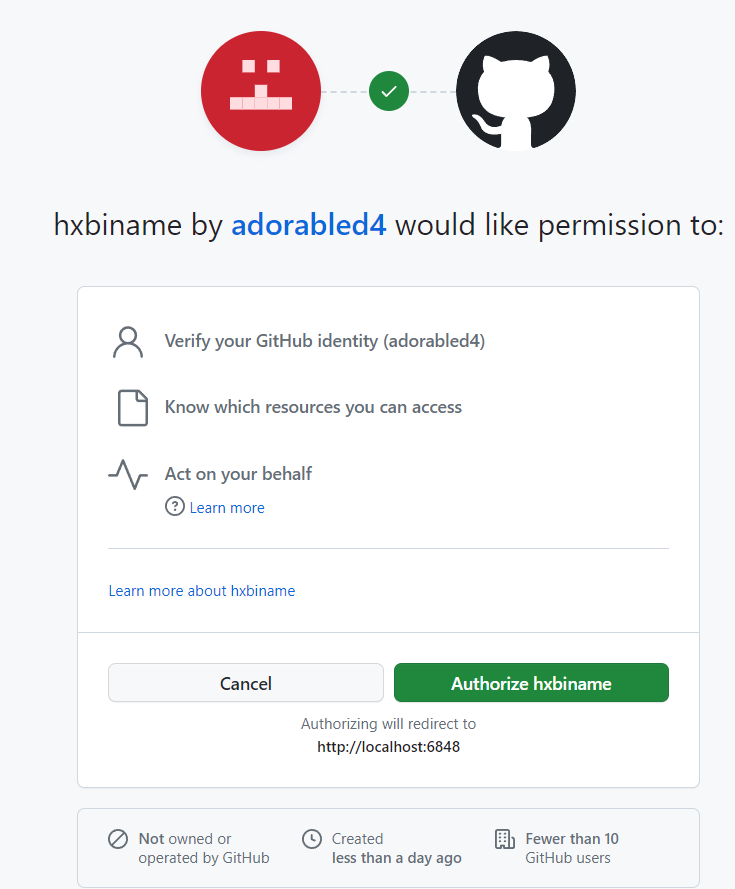
获取到的access_token信息
1
| access_token=ghu_vBmfKxThWOrPXPe0eNxThaLwRMcjrb2OuveW&expires_in=28800&refresh_token=ghr_WIfoPk2zd0XQ1sdb0Svd0uTJ8CeGwLt3qvx57dYKufdkBRHcBvINKdVY8412byEduUrotH1KpFV8&refresh_token_expires_in=15724800&scope=&token_type=bearer
|
获取到的用户信息
1
2
3
4
5
6
7
8
9
10
11
12
13
14
15
16
17
18
19
20
21
22
23
24
25
26
27
28
29
30
31
32
33
34
| {
"login": "adorabled4",
"id": 96526641,
"node_id": "U_kgDOBcDhMQ",
"avatar_url": "https://avatars.githubusercontent.com/u/96526641?v=4",
"gravatar_id": "",
"url": "https://api.github.com/users/adorabled4",
"html_url": "https://github.com/adorabled4",
"followers_url": "https://api.github.com/users/adorabled4/followers",
"following_url": "https://api.github.com/users/adorabled4/following{/other_user}",
"gists_url": "https://api.github.com/users/adorabled4/gists{/gist_id}",
"starred_url": "https://api.github.com/users/adorabled4/starred{/owner}{/repo}",
"subscriptions_url": "https://api.github.com/users/adorabled4/subscriptions",
"organizations_url": "https://api.github.com/users/adorabled4/orgs",
"repos_url": "https://api.github.com/users/adorabled4/repos",
"events_url": "https://api.github.com/users/adorabled4/events{/privacy}",
"received_events_url": "https://api.github.com/users/adorabled4/received_events",
"type": "User",
"site_admin": false,
"name": "adorabled4",
"company": null,
"blog": "https://blog.dhx.icu/",
"location": "CN",
"email": "dhx2648466390@163.com",
"hireable": null,
"bio": null,
"twitter_username": null,
"public_repos": 23,
"public_gists": 0,
"followers": 8,
"following": 13,
"created_at": "2021-12-22T11:07:54Z",
"updated_at": "2023-10-18T08:20:09Z"
}
|
桥接模式
介绍
桥接模式是将抽象部分与它的实现部分分离,使它们都可以独立地变化。它是一种对象结构型模式,又称为柄体(Handle and Body)模式或接口(Interfce)模式。
桥接模式UML类图如下
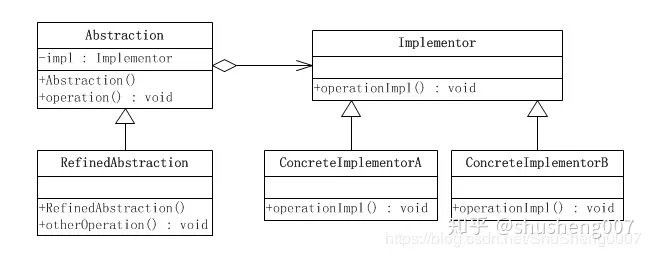
由于核心的代码已经在前面给出 , 这里主要在于重新组织代码的结构
最终的代码的结构是这样的

其中 RegisterLoginFuncInterface 主要定义 第三方登录需要的function , 也就是"需要使用工具去做什么" , 对应 UML图中的Implementor
而 AbstractRegisterLoginComponent 则是"规定使用哪种类型的工具" , RegisterLoginComponent 作为实现 , 则是指定"使用工具怎么做"
这里的工具也就是 LoginDefault , LoginByGitee , LoginByGithub
关于AbstractRegisterLoginFunc
我们的第三方登录 Implementor 只需要实现 login3rd 的逻辑 , 但是通用的 注册登录接口中 规定了需要实现其他的方法 , 因此这里使用一个 AbstractRegisterLoginFunc 实现 第三方impl 不需要实现的方法 , 但是对于方法的主体, 并不需要实现什么逻辑 , 只需要抛出 UnsupportedOperationException异常即可 。
试想假如我们使用LoginByGitee , 是不回去调用 默认登录的 login方法的, 这里的实现, 可以利好之后更多平台的第三方登录的implementor , 同时减少重复的代码。
1
2
3
4
| @Override
public BaseResponse login(String email, String password) {
throw new UnsupportedOperationException();
}
|
类似的设计比如JDK源码中 ArrayList
1
2
| public class ArrayList<E> extends AbstractList<E>
implements List<E>, RandomAccess, Cloneable, java.io.Serializable{}
|
其中的 AbstractList 中实现了 add方法 , 但是另一个类 EmptyList , 继承了AbstractList
1
2
3
| private static class EmptyList<E>
extends AbstractList<E>
implements RandomAccess, Serializable { }
|
但是我们知道 EmptyList 是不能添加任何元素的, 这里实际上AbstractList的add方法会抛出 UnsupportedOperationException , AbstractRegisterLoginFunc的设计同理
1
2
3
| public void add(int index, E element) {
throw new UnsupportedOperationException();
}
|
桥接模式实现

核心实现对应桥接模式的UML类图 , 核心的三方登录代码照搬之前给出的即可。
简单的对比适配器模式 , 可见桥接模式直接多出了六个类(加上后面的工厂模式就是七个),,,
好处就是 满足单一职责原则 , 各个类的功能更加独立, 之后扩展和修改更加方便
具体的代码参考 置顶的 Github仓库链接中 feature/3rdlogin-bridge分支即可 (个人还是比较倾向于适配器模式)
如何使用
对于登录的主要逻辑 , 都写在 implementor中, 这里我们把implementor注入到Spring中
对于不同的控制层接口 , 执行的三方平台是可以确定的 , 比如
1
| @GetMapping("/gitee/callback")
|
我们知道这个方法中应该调用Gitee对应的 implementor , 这里通过静态的工厂来获取指定的Bean即可
Spring的Bean容器中只有 implementor , RegisterLoginComponent 需要我们手动去注入 , 注意这里单例模式双检锁的设计。
1
2
3
4
5
6
7
8
9
10
11
12
13
14
15
16
17
18
19
20
21
22
23
24
25
| public class RegisterLoginComponentFactory {
public static Map<String, AbstractRegisterLoginComponent> componentMap = new ConcurrentHashMap<>();
public static Map<String, RegisterLoginFuncInterface> funcMap = new ConcurrentHashMap<>();
public static AbstractRegisterLoginComponent getComponent(String type) {
AbstractRegisterLoginComponent component = componentMap.get(type);
if(component == null) {
synchronized (componentMap) {
component = componentMap.get(type);
if(component == null) {
component = new RegisterLoginComponent(funcMap.get(type));
componentMap.put(type, component);
}
}
}
return component;
}
}
|
对于控制层接口 , 由于不同的三方登录平台的参数是不一致的 , 因此需要更改参数为HttpServletRequest
1
2
3
4
5
6
7
8
9
10
11
12
13
14
15
16
17
| @RestController
@RequestMapping(value = "/login3rd")
@Slf4j
public class LoginController {
@GetMapping("/gitee/callback")
public BaseResponse loginByGitee(HttpServletRequest httpServletRequest) {
AbstractRegisterLoginComponent gitee = RegisterLoginComponentFactory.getComponent("GITEE");
return gitee.login3rd(httpServletRequest);
}
@GetMapping("/github/callback")
public BaseResponse loginByGithub(HttpServletRequest httpServletRequest) {
AbstractRegisterLoginComponent github = RegisterLoginComponentFactory.getComponent("GITHUB");
return github.login3rd(httpServletRequest);
}
}
|
前后端联调
前面我们进行的测试以及配置仅仅是 后端在操作, 点击的过程还需要我们手动去模拟
下面以 完整的 前后端项目进行联调, 实现真正的 第三方登录
最开始的时候我也怀有疑问 :
Q : 后端的主要三方登录逻辑是通过回调消息来进行调用的, 我项目原本的登录方式是 前端接收后端返回的access_token进行登录鉴权 , 这样如何保证前端可以获取到用户登录的token呢?
A :
- 我们在通过后端测试的时候填写的
redirect_uri 为 后端接口回调消息的地址 , 后端的接口会通过接收参数执行对应的逻辑 , 从而完成用户登录以及默认的注册 。正常的第三方登录 , 在我们完成授权之后应该是重新跳转到我们前端的页面 , 自动完成登录的逻辑。
- 这里后端的代码是不需要修改的 , 我们需要做的是吧
redirect_uri改成前端的登录地址 , 然后通过重定向的路径参数/user/login?code=xxxxxxxxxxxxxxxxx , 访问后端的接口 , 执行登录的逻辑 , 从而使得前端接收到 access_token。这样做相当于 在上面测试的基础之上 , 多了前端作为中转,帮助用户执行操作
那么完整的执行逻辑就是
用户点击 第三方登录的按钮 =>
跳转到 第三方授权页面 (同时存储state)=>
用户授权成功 =>
重定向到前端页面 =>
拿到路径中的code =>
通过code以及state 访问后端的接口(原本的回调信息的接口) =>
执行登录逻辑 => 获取返回值中的jwt token => 登录成功 , 跳转到主页
OauthGitee.tsx
我们仍然是以Gitee为例 , 给出相关的代码和操作。
这里我通过OPENAPI 插件 , 自动生成了 访问后端loginByGitee(String code,String state)接口的方法
核心有两个方法 :
- getCode : 用户点击 第三方登录图标的事件 ,
- getToken : 异步调用 , 需要等待登录逻辑完成
1
2
3
4
5
6
7
8
9
10
11
12
13
14
15
16
17
18
19
20
21
22
23
24
25
26
27
28
29
30
| import { loginByGiteeUsingGET } from '@/services/bi/loginController';
import { message } from 'antd';
export const OauthGitee = {
getCode() {
const authorize_uri = 'https://gitee.com/oauth/authorize';
const client_id = '7d0bcf67xxxxxxxxxxxxxxxxxxxxxxb49e54';
const redirect_uri = 'http://localhost:8000/user/login';
location.href = `${authorize_uri}?client_id=${client_id}&redirect_uri=${redirect_uri}&response_type=code`;
localStorage.setItem('login_state', 'GITEE');
},
async getToken(code: string) {
const state = localStorage.getItem('login_state') || '';
const params: API.loginByGiteeUsingGETParams = { code: code, state: state };
let msg = await loginByGiteeUsingGET(params);
if (msg.code === 200) {
console.log('result : ', msg);
let token:string = msg.data ?? '';
localStorage.setItem('accessToken', token);
message.success('登录成功');
return token;
}
},
};
export default OauthGitee;
|
Login.tsx
由于我并不熟悉前端, 因此前端的代码逻辑较为简单(可能性能比较差)
这里做法是 在getCode() 方法执行的时候往本地存储 login_state , 用来标记当前是否执行过第三方登录
如果执行过, 那么就 访问后端的 回调接口 , 执行第三方登录
这里的页面跳转debug了很久。。。最后发现是 在登录之后需要执行 fetchUserInfo()把用户的信息存储到全局状态中 , 否则Antd 会判断用户没有登录 , 导致在 登录 和 主页 之间反复横跳
- 另外需要注意 ts 中 await 以及 async的关系 , 否则会导致很混乱(明明方法执行了 , 日志正确打印了, 但是效果却不对)
1
2
3
4
5
6
7
8
9
10
11
12
13
14
15
16
17
18
19
20
21
22
23
24
25
26
27
| const {initialState, setInitialState} = useModel('@@initialState');
const fetchUserInfo = async () => {
const userInfo = await initialState?.fetchUserInfo?.();
if (userInfo) {
flushSync(() => {
setInitialState((s) => ({
...s,
currentUser: userInfo,
}));
});
}
};
const checkLogin3rd = async ()=>{
const code = urlParams.get('code');
if (code) {
await OauthGitee.getToken(code)
const tmpToken = localStorage.getItem("accessToken")
if (tmpToken) {
await fetchUserInfo();
history.push(urlParams.get('redirect') || '/my_chart');
}
}
}
checkLogin3rd()
|
测试
启动前端以及后端项目 , 访问 http://localhost:8000/user/login , 点击 Github的图标
Antd 官方Icon库中没有码云的icon , 暂时使用github的来代替…

跳转到了 Gitee授权页面
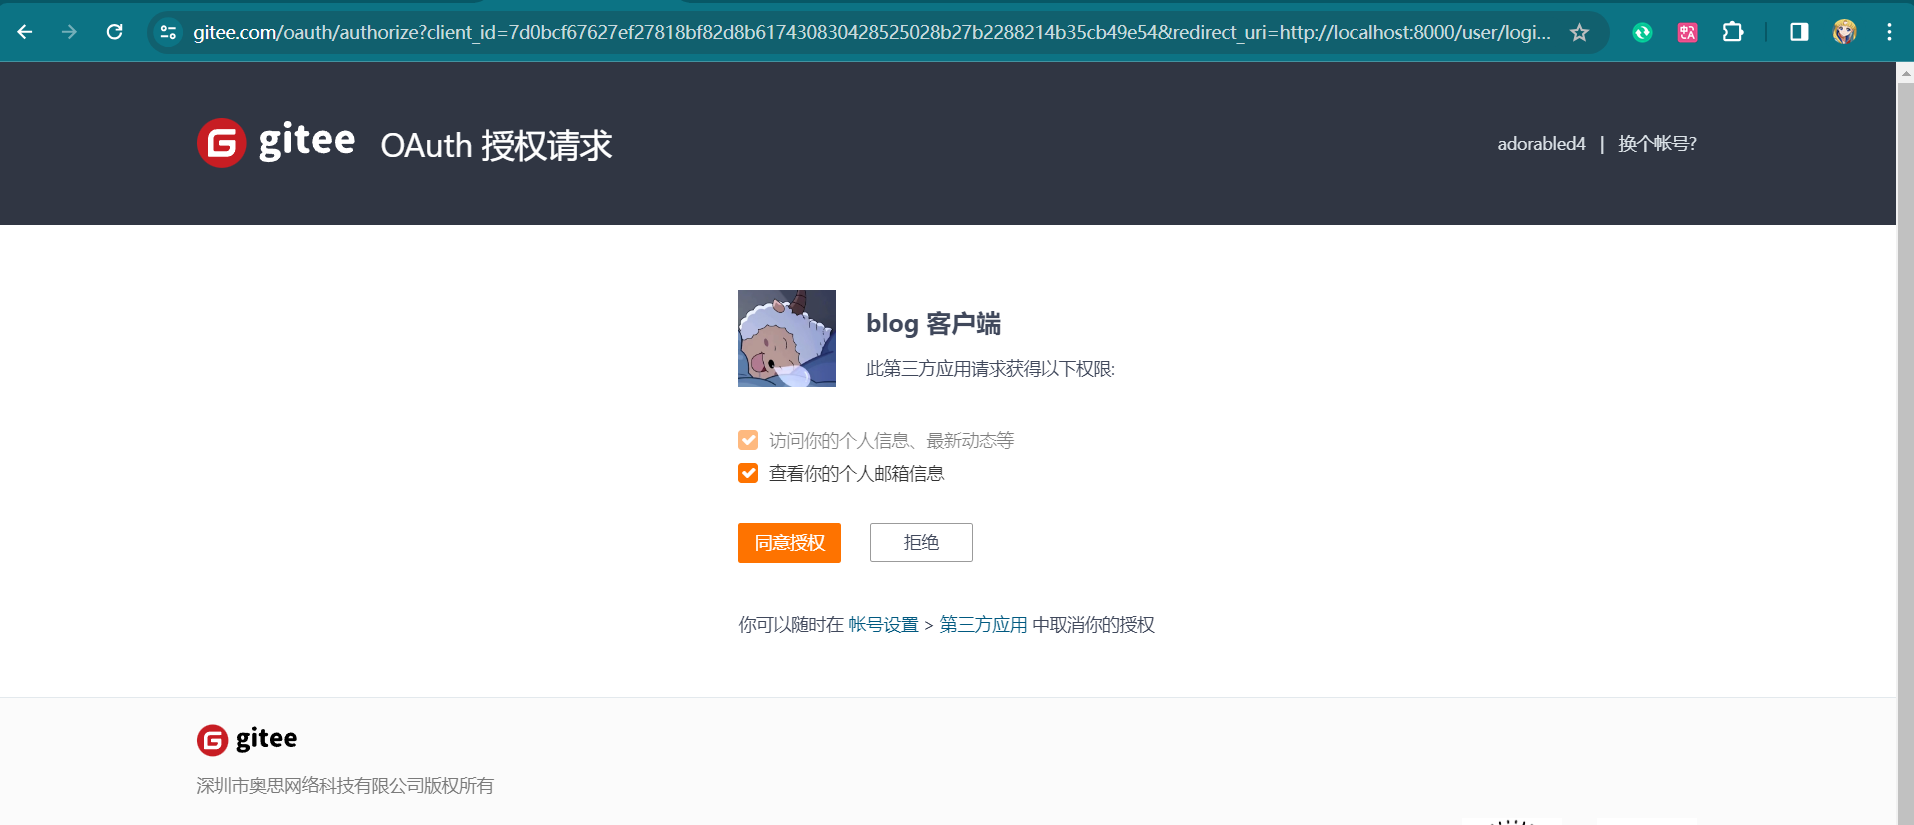
点击同意授权 , 页面正确跳转 , 后端日志也正确打印
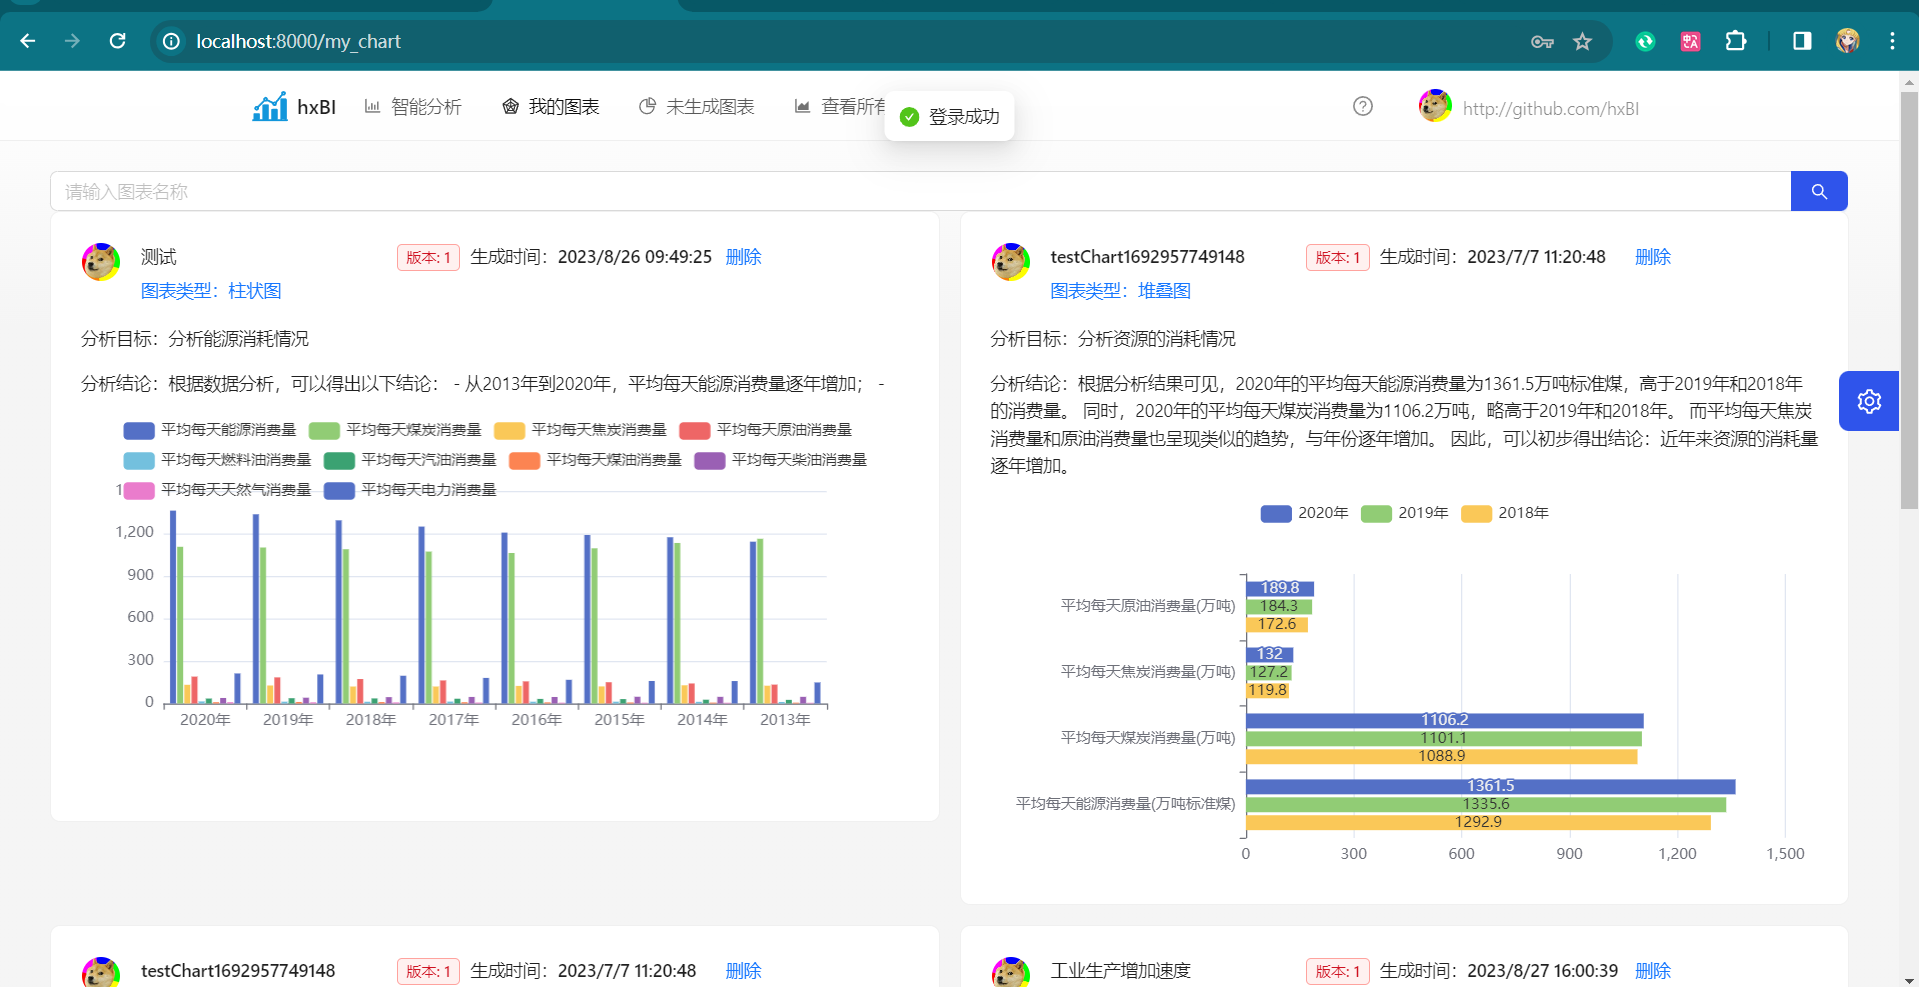

到这里第三方登录已经是正确完成了 , 完成了 从0~1的跨越, 扩展其他平台的Oauth 想必不存在太大的问题 。
reference


